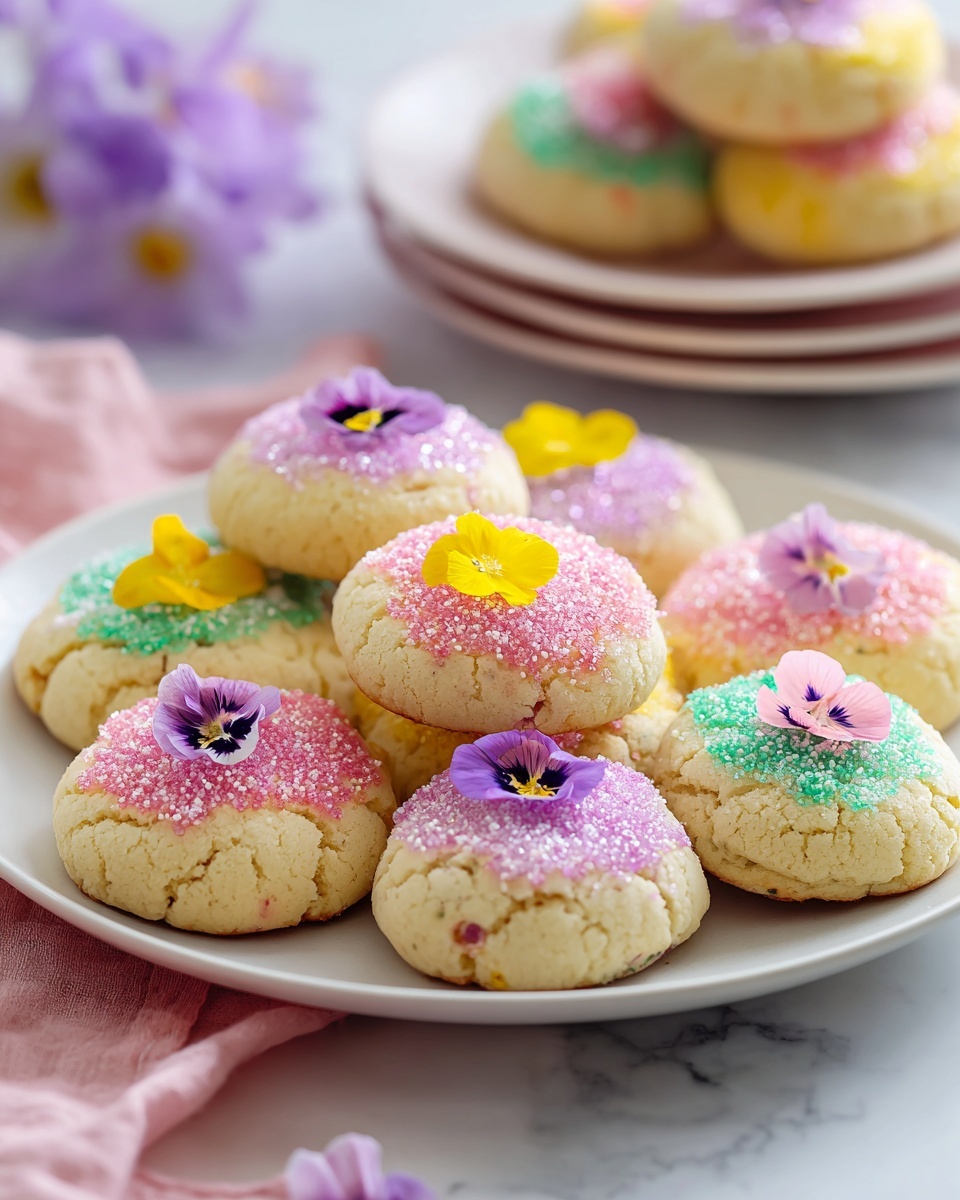
If you’re searching for a delightful treat that captures the delicate charm of spring, you’ve just found it with this Spring Blossom Cookies Recipe. These buttery cookies are perfectly soft with a gentle sweetness, all while showcasing gorgeous edible flowers on top that make each bite feel like a celebration of the season. Whether you’re baking for a sunny afternoon tea or to brighten up a special occasion, this recipe brings together simple ingredients and a splash of floral beauty to create cookies that are as joyful to look at as they are to eat.

Ingredients You’ll Need
The magic of this Spring Blossom Cookies Recipe lies in its simplicity: just a handful of pantry staples combined with the natural color and delicate flavor of edible flowers. Each ingredient plays its part in crafting cookies that are tender, flavorful, and visually stunning.
- 1 1/2 cups all-purpose flour: The base that gives the cookies their soft yet sturdy texture.
- 1/2 teaspoon baking powder: Helps the cookies rise slightly for a light, tender crumb.
- 1/4 teaspoon salt: Enhances the sweetness and balances the flavors perfectly.
- 1/2 cup unsalted butter, softened: Adds richness and contributes to the melt-in-your-mouth softness.
- 1/4 cup granulated sugar: Provides just the right touch of sweetness and works well with butter to create a light crumb.
- 1/4 cup powdered sugar: Adds extra fine sweetness and helps achieve a tender cookie crumb.
- 1 large egg: Binds the ingredients together beautifully and adds moisture.
- 1 teaspoon vanilla extract: Brings warmth and depth to the cookie flavor.
- Edible flowers (such as pansies, violets, or dandelions): These fresh blossoms transform the cookies into little works of art and add a subtle floral note.
How to Make Spring Blossom Cookies Recipe
Step 1: Preheat and Prepare
Start by preheating your oven to 350 degrees Fahrenheit, or 175 Celsius, and line a baking sheet with parchment paper. This ensures your cookies bake evenly and don’t stick, setting the stage for perfect bites every time.
Step 2: Mix the Dry Ingredients
In a medium bowl, whisk together the all-purpose flour, baking powder, and salt. Combining these dry ingredients evenly distributes the leavening and seasoning, creating a balanced base for your cookie dough.
Step 3: Cream Butter and Sugars
In a large bowl, beat the softened butter along with the granulated and powdered sugars until the mixture becomes light and fluffy. This step is crucial because it incorporates air, giving your cookies their tender and slightly airy texture.
Step 4: Add the Wet Ingredients
Blend in the egg and vanilla extract to the creamed butter and sugar until everything is smooth and well combined. This mixture forms the flavorful heart of the cookie dough.
Step 5: Combine Dry and Wet Mixtures
Gradually add your dry ingredients to the wet mixture, mixing gently until a soft dough comes together. Take care not to overmix here; you want to keep the cookies tender and not tough.
Step 6: Shape Your Cookies
Roll the dough into 1-inch balls and place them onto your prepared baking sheet, leaving about 2 inches between each one. Flatten each ball slightly to help them bake evenly and set the stage for your pretty floral topping.
Step 7: Decorate with Edible Flowers
Press one or two edible flowers onto the top of each cookie, making sure they stick well to the dough. These blossoms create an enchanting look that’s perfect for a seasonal touch or a special occasion.
Step 8: Bake Until Lightly Golden
Bake your cookies for 10 to 12 minutes or until the edges show a delicate golden hue. The scent wafting from your oven will be enough to make anyone eager to take a bite.
Step 9: Cool Before Enjoying
Let your Spring Blossom Cookies cool on the baking sheet for five minutes to set before transferring them to a wire rack to cool completely. This step ensures they’re firm enough to handle without breaking and lets flavors settle beautifully.
How to Serve Spring Blossom Cookies Recipe

Garnishes
Aside from the edible flowers already adorning your cookies, consider a light dusting of powdered sugar or a drizzle of honey for extra sparkle. Fresh mint leaves nearby can add a hint of green that ties beautifully to the floral theme.
Side Dishes
These cookies pair wonderfully with a cup of hot herbal tea, like chamomile or lavender, which complements the floral notes perfectly. They also work well alongside fresh fruit salads or a mild cream cheese spread for a refined little snack plate.
Creative Ways to Present
Arrange your Spring Blossom Cookies Recipe on a rustic wooden board or a pastel-colored platter to highlight their spring-time charm. For special occasions, place them inside decorative boxes or wrap them with delicate ribbons for charming homemade gifts.
Make Ahead and Storage
Storing Leftovers
To keep your cookies fresh, store them in an airtight container at room temperature for up to three days. Make sure they are completely cool before sealing to avoid sogginess.
Freezing
You can freeze these cookies by placing them in a single layer on a baking sheet until firm, then transferring them to a freezer-safe container. They’ll keep for up to one month and can be thawed overnight at room temperature.
Reheating
If you want to enjoy them warm, simply pop the cookies in a preheated oven at 300 degrees Fahrenheit for 5 minutes, or until slightly warmed without losing their delicate texture.
FAQs
Can I use any type of edible flowers for this Spring Blossom Cookies Recipe?
Yes! Just make sure the flowers are safe to eat and have not been treated with pesticides. Popular choices include pansies, violets, and dandelions, which all add unique color and mild flavor.
What if I don’t have powdered sugar?
You can omit powdered sugar or substitute with a bit more granulated sugar, though the texture might be slightly less tender. Powdered sugar helps achieve a delicate crumb in these cookies.
Can I make this recipe gluten-free?
Absolutely! Substitute the all-purpose flour with a gluten-free baking blend, making sure it includes xanthan gum or a similar binder to maintain the right texture.
How long do these cookies last if stored properly?
Stored in an airtight container at room temperature, you can enjoy them for up to three days. For longer storage, freezing is your best option.
Are these cookies suitable for kids?
Definitely! The recipe uses simple, natural ingredients and the edible flowers add a fun, colorful twist that kids usually love. Just be sure to use flowers that are safe and non-toxic.
Final Thoughts
I can’t recommend this Spring Blossom Cookies Recipe enough for anyone looking to add a touch of elegance and seasonal beauty to their baking. These cookies are irresistibly tender, subtly sweet, and simply charming with their floral garnishes. So don’t hesitate—grab your apron, gather your ingredients, and treat yourself to a batch that’s sure to brighten your day and impress everyone lucky enough to share them!
Print
Spring Blossom Cookies Recipe
- Prep Time: 15 minutes
- Cook Time: 12 minutes
- Total Time: 27 minutes
- Yield: 20 cookies
- Category: Dessert
- Method: Baking
- Cuisine: American
- Diet: Vegetarian
Description
Delight in these charming Spring Blossom Cookies, featuring a tender, buttery base adorned with delicate edible flowers. Perfect for celebrating the beauty of spring or adding a floral touch to your tea time treats, these cookies combine simple ingredients with an elegant presentation.
Ingredients
Dry Ingredients
- 1 1/2 cups all-purpose flour
- 1/2 teaspoon baking powder
- 1/4 teaspoon salt
Wet Ingredients
- 1/2 cup unsalted butter, softened
- 1/4 cup granulated sugar
- 1/4 cup powdered sugar
- 1 large egg
- 1 teaspoon vanilla extract
Decoration
- Edible flowers (such as pansies, violets, or dandelions), for decoration
Instructions
- Preheat & Prep: Preheat the oven to 350°F (175°C) and line a baking sheet with parchment paper to prevent sticking and ensure even baking.
- Mix Dry Ingredients: In a medium bowl, whisk together the all-purpose flour, baking powder, and salt to evenly distribute the leavening agent and seasoning.
- Cream Butter & Sugar: In a large bowl, beat the softened unsalted butter with granulated sugar and powdered sugar until the mixture becomes light and fluffy, about 2-3 minutes, to aerate the dough.
- Add Wet Ingredients: Mix in the large egg and vanilla extract until the mixture is well combined and smooth.
- Combine Mixtures: Gradually add the dry flour mixture to the wet ingredients, mixing gently until a soft dough forms without overworking it.
- Shape Cookies: Roll the dough into 1-inch balls, place them on the baking sheet spaced 2 inches apart, and flatten them slightly to prepare for even baking.
- Decorate: Gently press 1-2 edible flowers onto the top of each cookie, ensuring they adhere to the dough for a beautiful floral finish.
- Bake: Bake in the preheated oven for 10-12 minutes until the edges of the cookies turn a light golden color, indicating they are done.
- Cool: Allow the cookies to cool on the baking sheet for 5 minutes before transferring them to a wire rack to cool completely, which helps them set perfectly.
Notes
- Ensure the butter is softened to room temperature for easier creaming and better texture.
- Press edible flowers gently to avoid tearing them and to ensure they remain intact during baking.
- Use fresh, organic edible flowers that are safe for consumption and pesticide-free.
- Store the cookies in an airtight container at room temperature for up to 5 days.
- For added flavor, consider zesting a lemon or orange into the dough.


