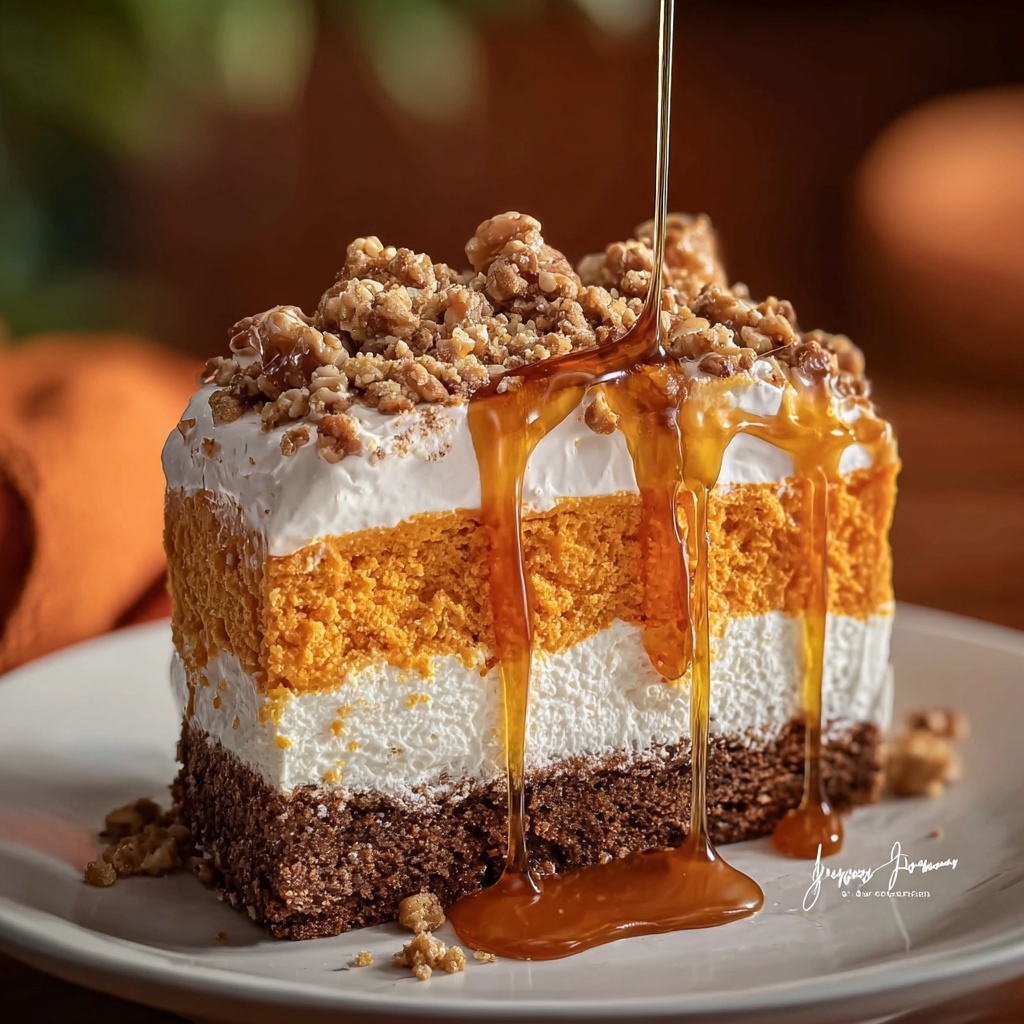
If you’re craving a cozy, comforting dessert that captures the essence of autumn in every bite, then you have to try this Pumpkin Dream Cake Recipe. This luscious treat marries moist, spiced pumpkin cake with rich caramel, creamy whipped topping, and decadent toffee bits for an unforgettable flavor experience. It’s incredibly easy to make and perfect for sharing with friends and family during any gathering or quiet weekend indulgence. Trust me, this Pumpkin Dream Cake Recipe is the kind of dessert that becomes a beloved classic in your recipe arsenal.
Ingredients You’ll Need
These simple yet essential ingredients come together beautifully to create the perfect balance of flavors and textures in this cake. Each one plays a crucial role, from the fluffy yellow cake base to the warm spices and the sweet finish that makes this dish truly dreamy.
- Yellow cake mix: The base of the cake, providing a tender crumb and light texture.
- Pumpkin puree: Adds moisture and that signature pumpkin flavor, as well as a lovely orange hue.
- Brown sugar: Brings a subtle caramel sweetness that deepens the flavor profile.
- Ground cinnamon: Infuses a warm, familiar spice that complements the pumpkin perfectly.
- Ground ginger: Adds a slight zing and depth to the spice blend.
- Ground nutmeg: Enhances the warmth and aromatic qualities of the cake.
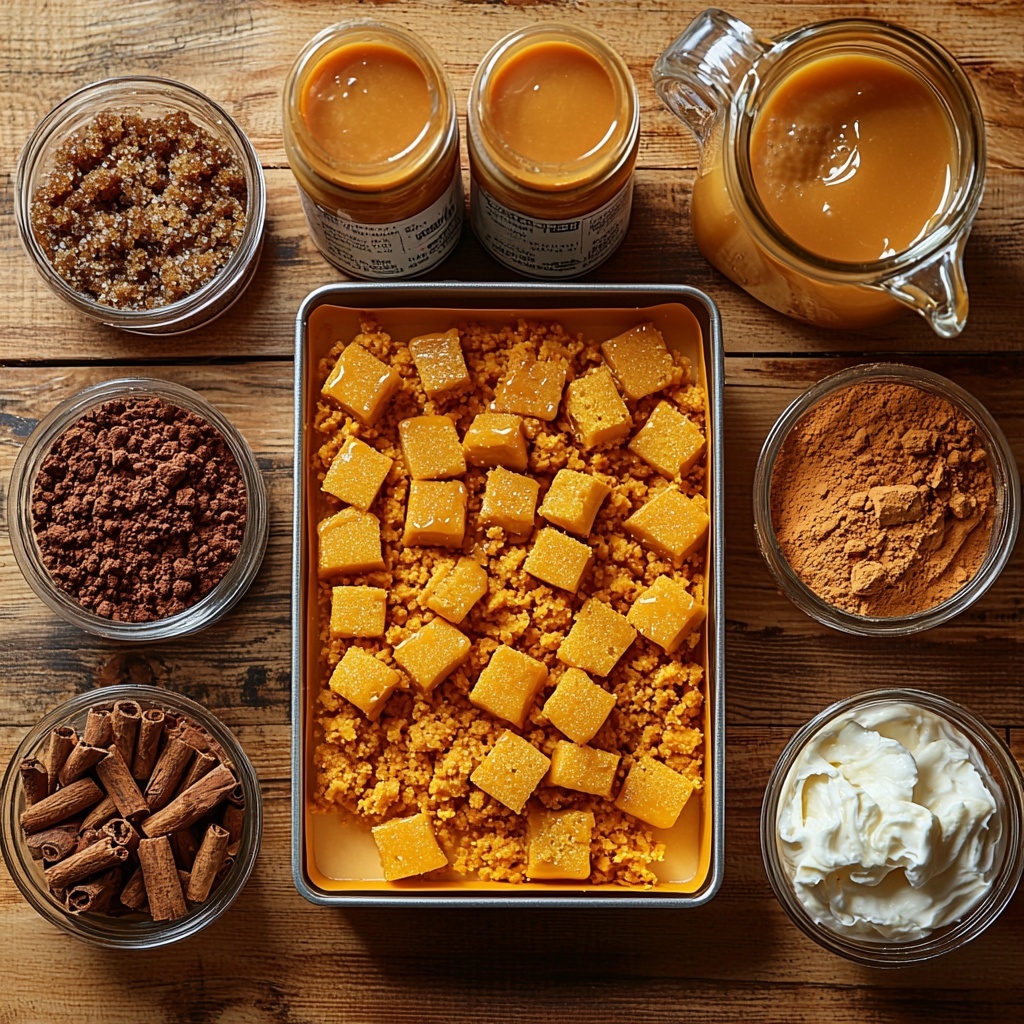
- Sweetened condensed milk: Poured into the cake to soak in, creating an ultra-moist and creamy texture.
- Whipped topping: Provides a light, airy finish that balances the rich elements of the dessert.
- Caramel sauce: Drizzled on top to add a luscious, gooey sweetness.
- Toffee bits: Sprinkled over for crunch and extra sweetness, offering a delightful contrast to the softness.
How to Make Pumpkin Dream Cake Recipe
Step 1: Prepare Your Oven and Pan
Start by preheating your oven to 350°F so it’s hot and ready once your batter is mixed. Grease a 9×13-inch baking pan thoroughly to ensure your cake doesn’t stick and comes out cleanly — this step makes all the difference for the presentation.
Step 2: Mix the Pumpkin Cake Batter
In a large mixing bowl, combine the yellow cake mix with pumpkin puree, brown sugar, cinnamon, ginger, and nutmeg. Stir everything together until the batter is smooth and evenly blended. This combination produces a vibrant, spiced pumpkin cake that’s moist and flavorful with every bite.
Step 3: Bake the Cake
Pour your pumpkin-infused batter into the prepared pan and spread it evenly with a spatula. Bake in the oven for 25 to 30 minutes, or until a toothpick inserted into the center comes out clean. This slow bake ensures your cake is cooked through but still perfectly tender.
Step 4: Create the Signature “Dream” Texture
Once the cake is out of the oven, let it cool for about 15 minutes — just enough so it’s warm but not hot. Then, take the handle of a wooden spoon and poke holes all over the surface. This step is key to making the Pumpkin Dream Cake Recipe so incredibly moist and rich, allowing the next ingredient to seep into every nook and cranny.
Step 5: Add the Sweetened Condensed Milk
Slowly pour the sweetened condensed milk over the cake, letting it soak into the holes you’ve made. This creates an irresistibly creamy and dense layer of sweetness inside the cake that elevates its texture and flavor to a whole new level.
Step 6: Top With Whipped Topping, Caramel, and Toffee
Once cooled completely, spread a generous layer of whipped topping across the surface. Next, drizzle caramel sauce over it for that iconic gooey sweetness that pairs so well with pumpkin. Finish by sprinkling toffee bits on top to add crunch and a delightful buttery flavor, making every forkful a little celebration.
Step 7: Chill and Serve
Refrigerate the cake for at least three hours before serving. This step allows the flavors to meld together, and the cake to firm up a bit, making it even more delicious and easier to slice.
How to Serve Pumpkin Dream Cake Recipe
Garnishes
To take your presentation up a notch, add a light dusting of cinnamon or nutmeg on top of the whipped topping. You could also place a small dollop of extra whipped cream with a sprinkle of crushed toffee beside each slice for a picture-perfect finish.
Side Dishes
A warm cup of spiced chai tea or freshly brewed coffee pairs wonderfully with Pumpkin Dream Cake Recipe. Its rich sweetness balances the flavors in your cup and makes for a cozy, comforting combo. For an extra indulgent touch, serve with vanilla ice cream on the side.
Creative Ways to Present
For a festive touch, serve your cake in individual mason jars layered with extra caramel and toffee bits, perfect for parties. Or, turn it into a trifle by layering cake pieces with whipped topping and pumpkin spice pudding for a layered visual delight and taste explosion.
Make Ahead and Storage
Storing Leftovers
After enjoying your Pumpkin Dream Cake Recipe, store any leftovers in an airtight container in the refrigerator. The cake will keep well for about 3 to 4 days, maintaining its moist texture and luscious topping.
Freezing
If you want to enjoy this dessert later, you can freeze the cake (without the whipped topping and toffee) wrapped tightly in plastic wrap and aluminum foil. Freeze for up to 2 months and thaw overnight in the fridge before adding fresh toppings and serving.
Reheating
This cake is typically served cold, but if you prefer a warmer treat, pop a slice in the microwave for 15 to 20 seconds. This softens the cake and slightly melts the caramel, delivering a cozy, comforting experience.
FAQs
Can I use homemade pumpkin puree for this recipe?
Absolutely! Homemade pumpkin puree works just as well and can add a fresh, natural flavor to your Pumpkin Dream Cake Recipe. Just make sure it’s smooth and not watery for the best results.
Is it possible to make this cake gluten-free?
You can use a gluten-free yellow cake mix to make this recipe gluten-free, but be sure that other ingredients like the toffee bits and caramel sauce are also gluten-free to keep it safe for those with sensitivities.
Can I substitute whipped topping with cream cheese frosting?
Yes! Cream cheese frosting would add a tangy contrast to the sweetness of the cake, making it equally delicious. Just keep in mind it will change the texture and flavor profile slightly from the original Pumpkin Dream Cake Recipe.
How long should I let the cake chill before serving?
Chilling the cake for at least 3 hours allows the sweetened condensed milk to soak in fully and the topping to set nicely. For even better flavor, chilling overnight is highly recommended.
Can I double the recipe for a larger crowd?
Definitely! Just double all the ingredients and bake in two 9×13-inch pans or use a larger pan with increased baking time. Keep an eye on the cake and test for doneness accordingly.
Final Thoughts
There’s truly nothing like sinking a fork into a slice of this Pumpkin Dream Cake Recipe — it’s a delicious blend of cozy spices, creamy textures, and sweet, buttery crunch that’s hard to resist. Whether you’re baking for a holiday gathering or simply because you want to treat yourself, this cake is effortless to make yet feels incredibly special. I can’t wait for you to try it and watch it become a fast favorite in your home!
Print
Pumpkin Dream Cake Recipe
- Prep Time: 15 minutes
- Cook Time: 30 minutes
- Total Time: 4 hours (including chilling time)
- Yield: 12 servings
- Category: Dessert
- Method: Baking
- Cuisine: American
Description
This Pumpkin Dream Cake is a moist and flavorful dessert perfect for autumn gatherings. Combining a yellow cake mix with pumpkin puree and warm spices, it’s baked to perfection, then topped with sweetened condensed milk, whipped topping, caramel sauce, and crunchy toffee bits for a decadent treat that’s sure to impress.
Ingredients
Cake Batter
- 1 box yellow cake mix
- 1 can (15 oz) pumpkin puree
- 2 tablespoons brown sugar
- 1/2 teaspoon ground cinnamon
- 1/4 teaspoon ground ginger
- 1/4 teaspoon ground nutmeg
Toppings
- 1 can (14 oz) sweetened condensed milk
- 1 tub (8 oz) whipped topping
- 1 cup caramel sauce
- 1/2 cup toffee bits
Instructions
- Preheat Oven and Prepare Pan: Preheat your oven to 350°F (175°C) and grease a 9×13-inch baking pan thoroughly to prevent sticking.
- Mix Cake Batter: In a large mixing bowl, combine the yellow cake mix, pumpkin puree, brown sugar, cinnamon, ginger, and nutmeg. Stir gently until the batter is smooth and well blended.
- Bake the Cake: Pour the batter into the prepared baking pan and spread it out evenly. Bake in the preheated oven for 25-30 minutes, or until a toothpick inserted into the center comes out clean.
- Cool and Poke Holes: Let the cake cool in the pan for about 15 minutes. Using the handle of a wooden spoon, poke holes evenly all over the surface of the cake to allow the condensed milk to seep in.
- Add Sweetened Condensed Milk: Pour the entire can of sweetened condensed milk over the cake, making sure it seeps into the holes. Let the cake cool completely to absorb the milk.
- Assemble Toppings: Once the cake has cooled, spread the whipped topping evenly over the surface. Drizzle with caramel sauce and sprinkle the toffee bits on top for added texture and sweetness.
- Chill Before Serving: Refrigerate the assembled cake for at least 3 hours to set and enhance the flavors. Serve chilled and enjoy your Pumpkin Dream Cake.
Notes
- Ensure the cake is completely cool before spreading the whipped topping to prevent melting.
- If you don’t have toffee bits, chopped nuts or crushed cookies can be a good substitute.
- This cake is best served chilled, so plan ahead for refrigeration time.
- The cake mix can be substituted with gluten-free yellow cake mix if desired.
- Leftovers can be stored covered in the refrigerator for up to 4 days.


