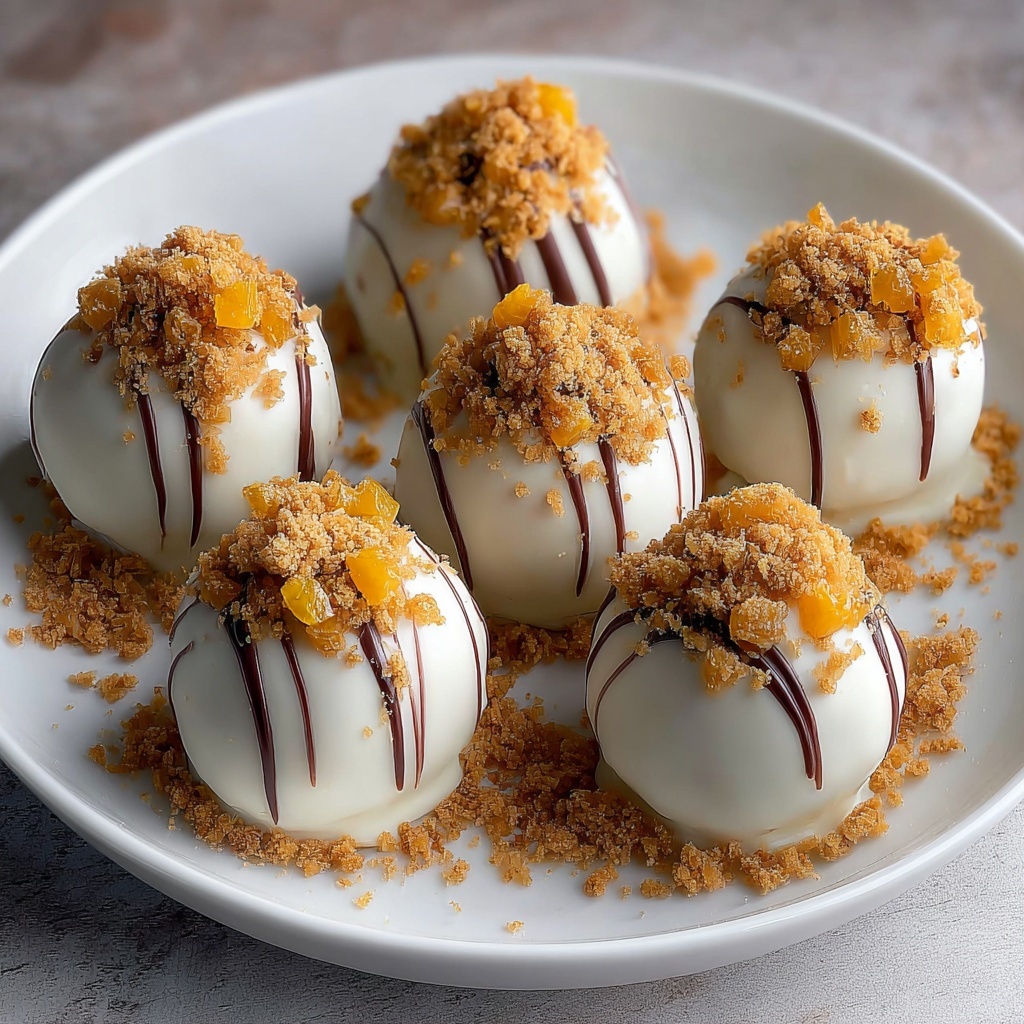
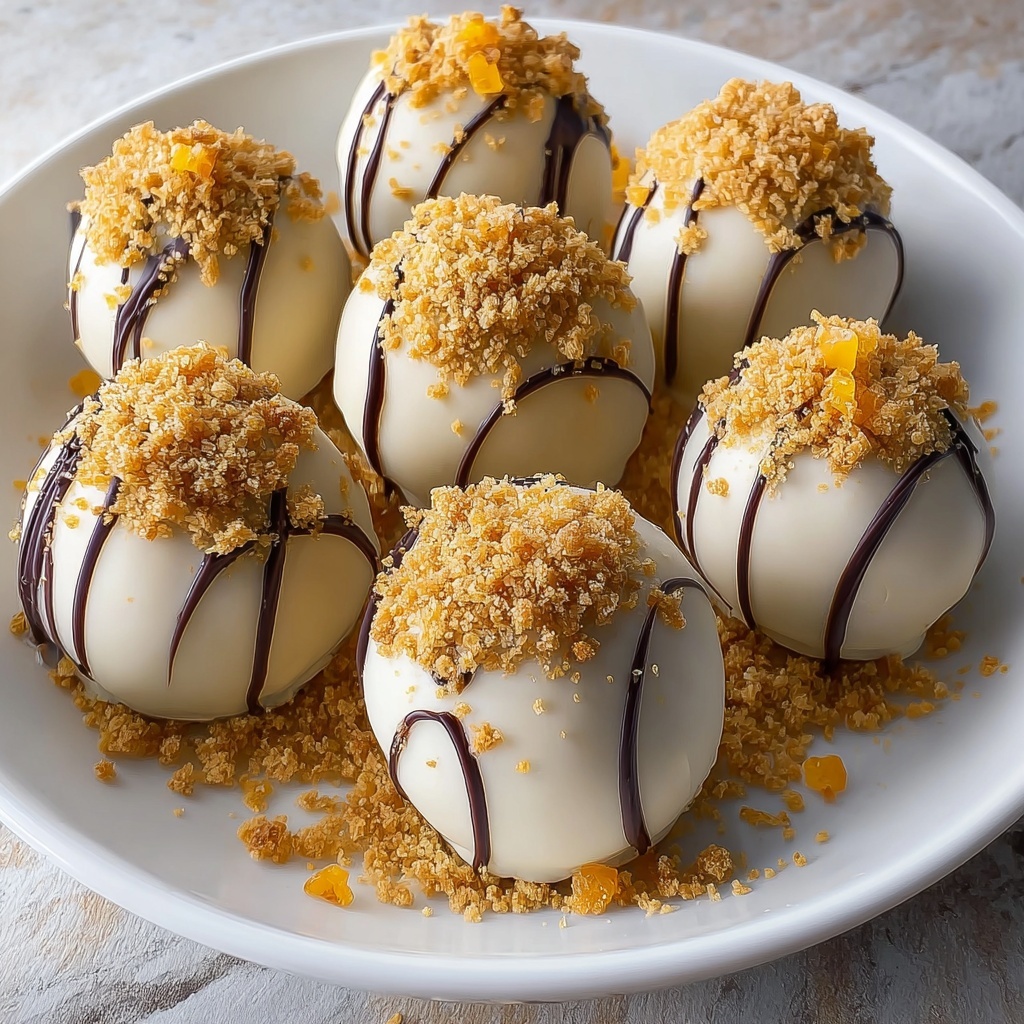
If you are craving a bite-sized treat that perfectly blends creamy indulgence with the warm, cozy flavors of autumn, this Pumpkin Cheesecake Truffles Recipe is your new best friend. These delightful little gems pack the smooth richness of cheesecake combined with spiced pumpkin and a crisp white chocolate shell, creating a perfect harmony of textures and tastes. Whether you need a festive dessert for fall gatherings or a sweet surprise to brighten any day, these truffles will quickly become a beloved favorite.
Ingredients You’ll Need
The beauty of this recipe lies in its simple yet essential ingredients, each chosen to build layers of flavor, creamy texture, and irresistible color. From the classic tang of cream cheese to the aromatic spice blend, every component plays a key role in crafting these delightful truffles.
- 1/2 cup canned pumpkin puree: Provides that smooth, seasonal pumpkin flavor and moist texture.
- 1/2 cup graham cracker crumbs: Adds subtle sweetness and a hint of crunch within the truffle center.
- 8 oz cream cheese, softened: The rich and creamy base that gives these truffles their luscious texture.
- 1 cup powdered sugar: Sweetens and helps to bind the mixture smoothly.
- 1 teaspoon vanilla extract: Enhances the overall flavor with a warm, sweet note.
- 1 teaspoon pumpkin pie spice: Brings that classic fall spice blend for a perfect autumn kick.
- 16 oz white chocolate, for melting: Creates the delicate and sweet outer shell that contrasts the creamy inside.
- 1/4 cup gingersnap cookies, crushed (optional, for coating): Offers a spicy crunch if you want an extra texture layer outside.
- 1/4 cup graham cracker crumbs (optional, for coating): A mild coating option that adds extra sweetness and bite.
- 1 tablespoon coconut oil or vegetable oil: Helps the white chocolate melt smoothly and form a glossy coating.
How to Make Pumpkin Cheesecake Truffles Recipe
Step 1: Beat the Cream Cheese Until Smooth
Start by placing the softened cream cheese into a large mixing bowl. Use an electric mixer or a sturdy whisk to beat it until you get a creamy, smooth consistency. This step is crucial as it forms the luscious base of your truffles and ensures there are no lumps.
Step 2: Add Pumpkin Puree and Combine
Next, stir in the pumpkin puree. Mix until it’s fully incorporated into the cream cheese. This not only adds that distinctive pumpkin flavor but also lends moisture and a beautiful orange hue to the mixture.
Step 3: Beat in Powdered Sugar Gradually
Gradually add the powdered sugar while continuing to beat the mixture. This gradual process ensures the sweetness is evenly distributed and the texture remains silky smooth and not grainy, which is perfect for forming balls later on.
Step 4: Mix in Dry Ingredients and Flavorings
Now stir in the graham cracker crumbs, vanilla extract, and pumpkin pie spice. These ingredients balance flavor and texture, making sure your truffles have that classic pumpkin cheesecake taste with a hint of spice while holding their shape well.
Step 5: Chill the Mixture
Cover the bowl and place it in the refrigerator for about 2 hours. Chilling firms up the mixture, making it easier to scoop and roll into perfect little balls in the next step.
Step 6: Form the Truffle Balls
Once the mixture is firm, scoop approximately 1 tablespoon of it and roll between your palms to create smooth, round truffles. Place each ball on a baking sheet lined with parchment paper to keep them from sticking.
Step 7: Melt the White Chocolate Coating
In a heatproof bowl, gently melt the white chocolate along with the coconut or vegetable oil. Use a double boiler or microwave in short bursts, stirring frequently until fully melted and smooth. The oil helps give your coating a beautiful shine and smooth texture.
Step 8: Dip Truffles in White Chocolate
Using a fork or dipping tool, coat each cheesecake ball thoroughly in the melted white chocolate, letting any excess drip back into the bowl. This creates a delicate shell that balances creamy filling and adds a satisfying snap.
Step 9: Add Optional Coatings
While the chocolate is still wet, sprinkle the tops with crushed gingersnap cookies or graham cracker crumbs if you like extra texture and flavor contrast. This finishing touch elevates the truffles from delicious to unforgettable.
Step 10: Chill to Set the Coating
Transfer the coated truffles back to the parchment-lined tray and refrigerate for about 30 minutes. This step solidifies the chocolate shell, making them easy to handle and perfect for serving.
Step 11: Store Properly Until Serving
Finally, store the finished truffles in an airtight container and keep them refrigerated. This keeps them fresh and maintains that creamy, dreamy texture until you’re ready to enjoy.
How to Serve Pumpkin Cheesecake Truffles Recipe

Garnishes
Adding a little extra garnish can make these truffles look just as stunning as they taste. Consider a light dusting of cinnamon, a few chocolate shavings, or even a tiny drizzle of caramel sauce to amp up their visual and flavor appeal. These garnishes offer a touch of elegance and a hint of extra sweetness.
Side Dishes
While these truffles are perfect on their own, pairing them with a hot cup of spiced chai tea, warm coffee, or even a glass of late-harvest wine can create a complementary balance that highlights the warm spices and creamy textures. They also work beautifully as a sweet finish after a cozy fall dinner.
Creative Ways to Present
For festive occasions, arrange your pumpkin cheesecake truffles on a decorative plate or tiered tray surrounded by autumn leaves or mini pumpkins. Wrapping individual truffles in clear cellophane tied with a ribbon can also make charming homemade gifts that friends and family will adore. Presentation can turn this simple treat into an unforgettable experience.
Make Ahead and Storage
Storing Leftovers
These truffles keep wonderfully in the refrigerator for up to a week. Just be sure to store them in an airtight container to protect them from absorbing other odors and to preserve their creamy texture and chocolate coating.
Freezing
If you want to prepare Pumpkin Cheesecake Truffles Recipe ahead of time, they freeze beautifully. Arrange the truffles on a baking sheet and freeze until solid, then transfer to a freezer-safe container or bag. When ready to enjoy, thaw them in the refrigerator overnight to maintain their perfect texture.
Reheating
Since these truffles are best served chilled, reheating is not recommended. However, if the white chocolate shell becomes too firm, letting them sit at room temperature for 10-15 minutes will soften the center slightly without losing the contrast of textures that makes them special.
FAQs
Can I use fresh pumpkin instead of canned puree?
Fresh pumpkin can be used, but it needs to be cooked and pureed thoroughly first to achieve the smooth consistency required. Canned pumpkin puree is convenient and consistently smooth, which helps maintain the perfect texture in your truffles.
What can I substitute for white chocolate?
If white chocolate is not your favorite, you can use milk or semi-sweet chocolate instead. Keep in mind this will change the flavor profile slightly, giving it a richer or less sweet coating, but it remains delicious.
Are these truffles gluten-free?
Traditional graham cracker crumbs and gingersnap cookies contain gluten, so for a gluten-free version, use certified gluten-free crackers or skip the coatings altogether. The pumpkin cheesecake mixture itself is naturally gluten-free.
Can I make these truffles vegan?
To make a vegan Pumpkin Cheesecake Truffles Recipe, substitute cream cheese with a vegan cream cheese alternative, use dairy-free white chocolate, and ensure all other ingredients like the cookies or crackers are vegan-friendly. The flavor will remain wonderful!
How long do Pumpkin Cheesecake Truffles Recipe last?
Stored correctly in the refrigerator, these truffles remain fresh for up to one week. For best flavor and texture, try to consume them within that time frame.
Final Thoughts
There is something incredibly satisfying about making and sharing these Pumpkin Cheesecake Truffles Recipe. They bring a joyful blend of creamy pumpkin, nostalgic seasonings, and sweet white chocolate that feels like a cozy hug in every bite. I encourage you to give this recipe a try — your taste buds will thank you, and you might just find yourself making them again and again each fall!
Print
Pumpkin Cheesecake Truffles Recipe
- Prep Time: 0h 30m
- Cook Time: 0h 0m
- Total Time: 3h 0m
- Yield: Approximately 24 truffles
- Category: Dessert
- Method: No-Cook
- Cuisine: American
- Diet: Vegetarian
Description
These Pumpkin Cheesecake Truffles are a delightful no-bake treat combining creamy cheesecake with seasonal pumpkin flavor, all coated in smooth white chocolate and optionally dusted with gingersnap or graham cracker crumbs for extra crunch.
Ingredients
Cheesecake Mixture
- 1/2 cup canned pumpkin puree
- 1/2 cup graham cracker crumbs
- 8 oz cream cheese, softened
- 1 cup powdered sugar
- 1 teaspoon vanilla extract
- 1 teaspoon pumpkin pie spice
Coating & Garnishes
- 16 oz white chocolate, for melting
- 1 tablespoon coconut oil or vegetable oil
- 1/4 cup gingersnap cookies, crushed (optional, for coating)
- 1/4 cup graham cracker crumbs (optional, for coating)
Instructions
- Beat cream cheese: In a large mixing bowl, beat the cream cheese until it becomes smooth and creamy, forming the base for your truffle mixture.
- Mix in pumpkin: Add the canned pumpkin puree to the cream cheese and mix thoroughly until fully combined, ensuring even pumpkin flavor throughout.
- Add powdered sugar: Gradually beat in the powdered sugar, continuing to mix until the mixture is smooth and sweetened evenly.
- Incorporate dry ingredients and spices: Stir in the graham cracker crumbs, vanilla extract, and pumpkin pie spice until well combined. The texture should be smooth yet firm enough to shape into balls.
- Chill mixture: Cover and refrigerate the mixture for about 2 hours to let it firm up, making it easier to handle for shaping.
- Form truffle balls: Scoop small portions (approximately 1 tablespoon each) and roll them into balls by hand. Place the prepared balls on a parchment-lined baking sheet.
- Melt chocolate coating: In a heatproof bowl, melt the white chocolate together with the coconut oil or vegetable oil over a double boiler or microwaving in 30-second intervals, stirring until smooth and fully melted.
- Dip truffles in chocolate: Using a fork, dip each pumpkin cheesecake ball into the melted white chocolate, coating completely. Let excess chocolate drip off before returning the truffle to the parchment-lined sheet.
- Add coatings: While the chocolate is still wet, sprinkle the truffles with crushed gingersnap cookies or graham cracker crumbs for added texture and flavor, if desired.
- Set chocolate: Refrigerate the coated truffles for about 30 minutes, or until the chocolate sets firmly.
- Store: Transfer the finished truffles to an airtight container and keep refrigerated until ready to serve, preserving freshness and texture.
Notes
- Ensure the cream cheese is softened at room temperature for easy mixing and a smooth texture.
- Use full-fat cream cheese for the best creamy consistency and taste.
- The optional coatings add crunch and enhance flavor but can be omitted for a smoother finish.
- Handle the truffles gently when dipping to maintain their shape.
- Store truffles refrigerated and consume within 3-4 days for optimal freshness.
- For a stronger pumpkin flavor, increase the pumpkin puree slightly, but be mindful it may affect firmness.
