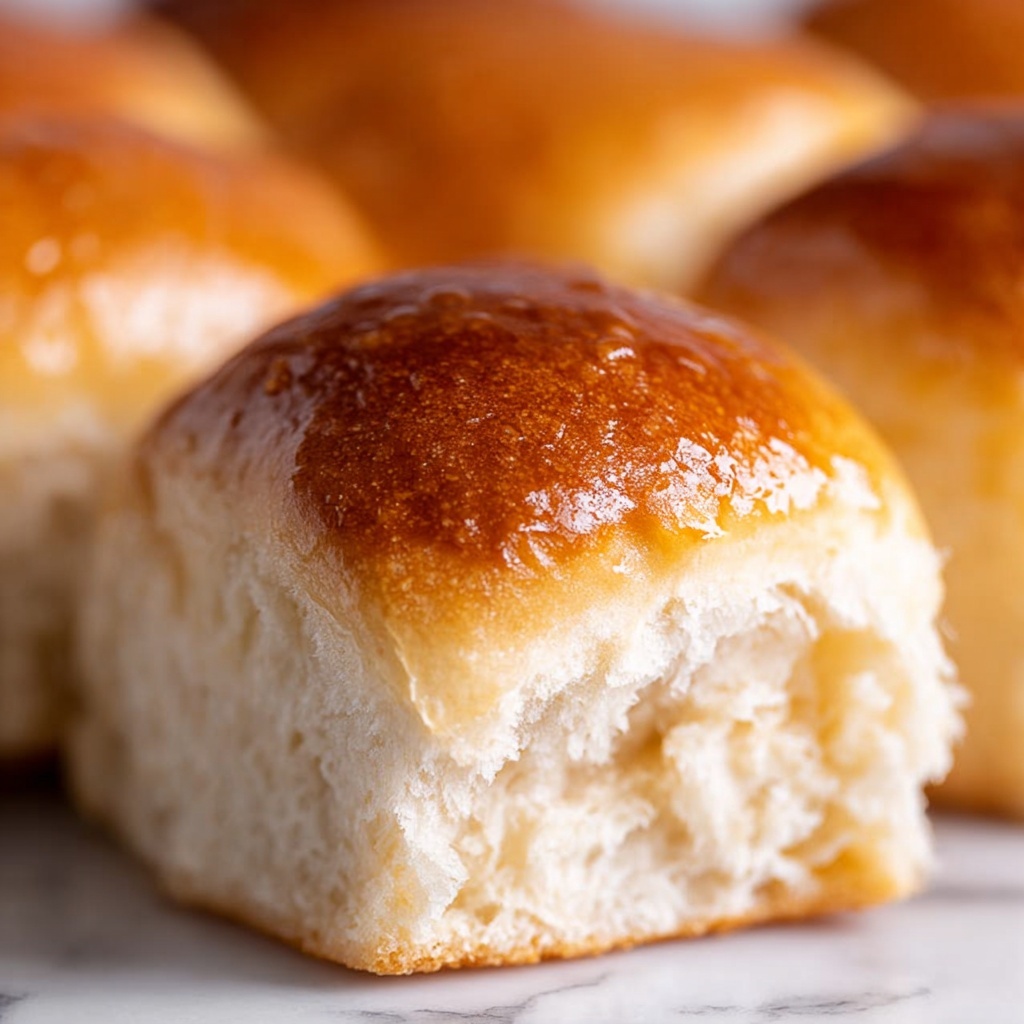
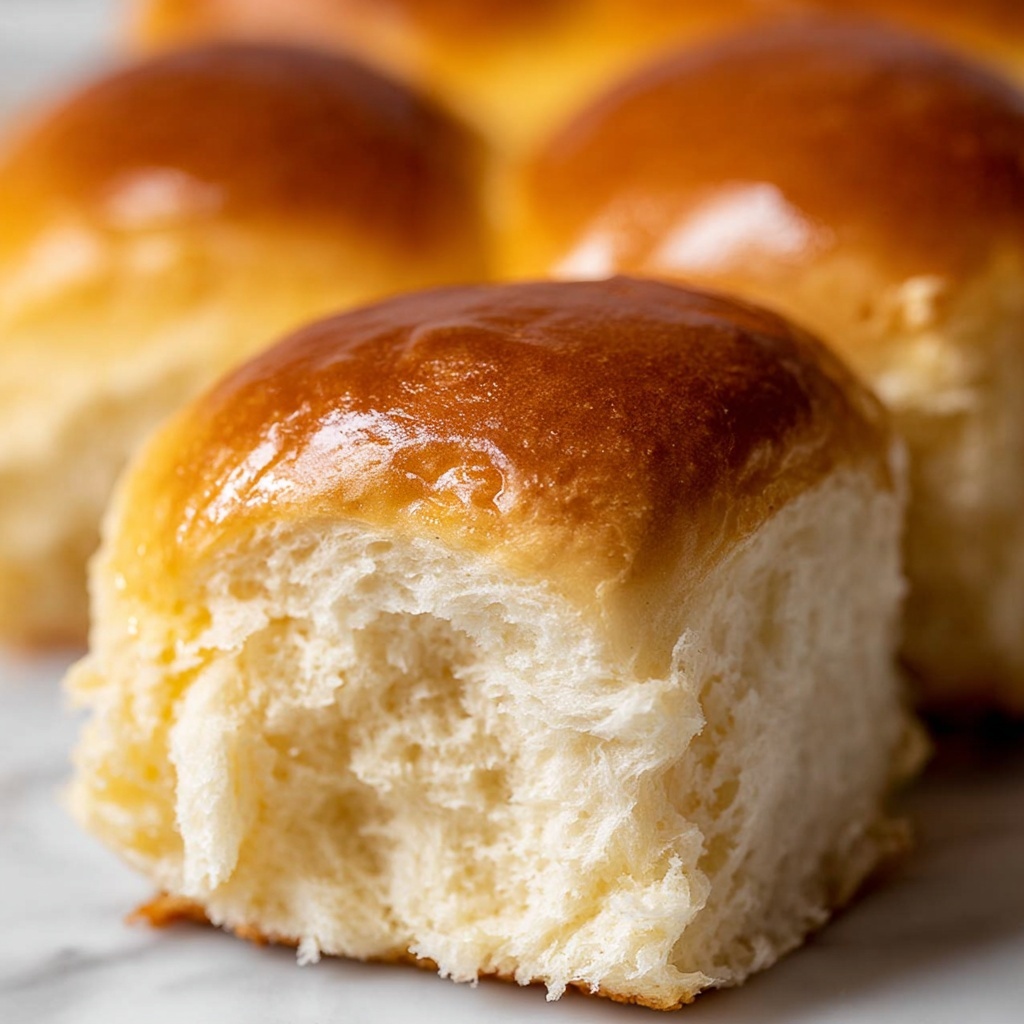
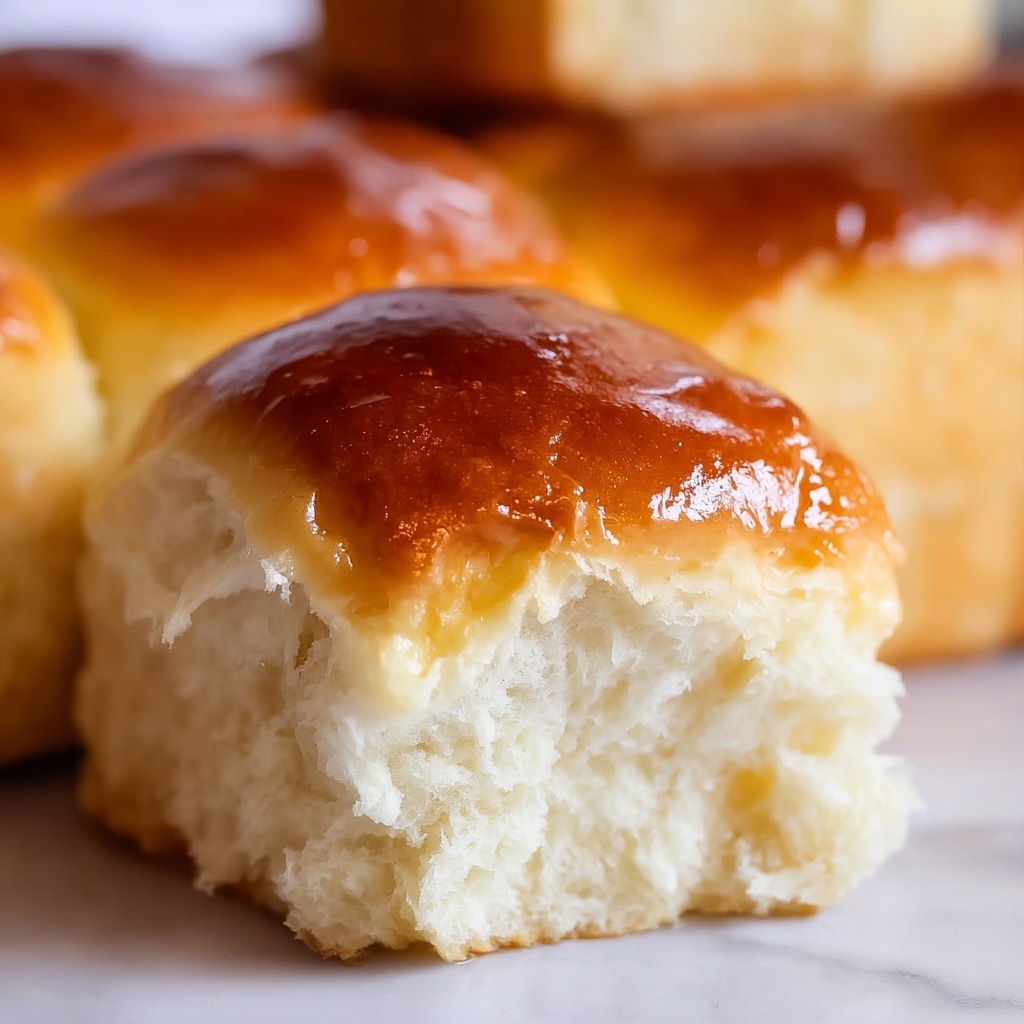
If you’re craving soft, fluffy, and utterly irresistible bread but don’t have all day to wait, this One Hour Quick Dinner Rolls Recipe is about to become your new best friend. These dinner rolls come together with minimal fuss, and the secret is all in the timing and technique that gets you the warmest, most tender rolls straight from your oven in just about an hour. Perfect for busy weeknights or last-minute dinner guests, these rolls are a comforting hug of homemade goodness that pairs beautifully with every meal. Once you try this recipe, you’ll wonder how you ever lived without these speedy, scrumptious rolls on your table.
Ingredients You’ll Need
Creating these quick dinner rolls relies on simple but essential ingredients, each adding a crucial element to the dough’s texture, flavor, and richness. Every component works in harmony to give you that soft crumb and golden exterior you’ll love.
- Warm water (3 tablespoons): Activates the yeast and kickstarts the rise for fluffy rolls.
- Active dry yeast (1 tablespoon): The magic ingredient that makes your dough rise beautifully.
- Sugar (1 teaspoon to activate yeast, plus 3 tablespoons for dough): Feeds the yeast and adds a subtle sweetness for depth.
- Kosher salt (1 teaspoon): Balances flavor and enhances the dough’s overall taste.
- Shortening (3 tablespoons): Keeps the rolls tender and moist.
- Milk (3/4 cup): Adds richness and softness to the dough.
- Large egg (1): Adds structure and a slight richness.
- All-purpose flour (2 1/2 cups, spooned and leveled): The foundation of your dough—gives structure and chew.
- Butter (1 tablespoon to grease pan, 1 tablespoon to top): Creates golden crust and adds buttery flavor.
How to Make One Hour Quick Dinner Rolls Recipe
Step 1: Proof the Yeast
Start by warming your water to a perfect lukewarm temperature—think of the comfort of bathwater, around 105-110 degrees Fahrenheit. Add your yeast and a teaspoon of sugar, then stir gently. Let it rest for 5 minutes until it bubbles and foams, signaling that your yeast is alive and ready to work its magic.
Step 2: Mix the Dry Ingredients
While your yeast is proofing, gather the sugar, kosher salt, shortening, and a portion of your flour in a large bowl or your stand mixer. This combination lays the groundwork for the rich, tender texture you’ll love in your finished rolls.
Step 3: Warm Your Milk
Heat the milk slowly in the microwave in short bursts until it matches the yeast water temperature—warm to the touch but not hot. This ensures your dough develops that soft crumb and golden crust.
Step 4: Combine and Mix Dough
Add the warm milk to your dry ingredients, then stir or beat with a paddle attachment (or just your hands if you prefer a hands-on approach). Now, add the bubbly yeast mixture along with the egg, mixing everything until well combined.
Step 5: Add Remaining Flour and Knead
Begin folding in the rest of your flour incrementally. The dough should come together until it’s soft, smooth, and a little sticky—don’t overdo the flour or the rolls will lose their tenderness. Knead the dough for five minutes in your stand mixer, or about eight minutes by hand on a floured surface, developing elasticity and strength.
Step 6: First Rest
Shape your dough into a ball and cover it with a tea towel. This resting period of 5 to 10 minutes helps relax the dough and makes shaping easier.
Step 7: Prepare Your Baking Pan
Preheat your oven to 375 degrees Fahrenheit, then melt butter in your chosen pan or cast iron skillet to grease it perfectly. Use a pastry brush to coat the sides and keep the pan warm while you shape the rolls.
Step 8: Shape the Rolls
Press the dough gently to release air bubbles, then divide it evenly into 12 pieces. Shape each piece by rounding one side and pinching the other to create little dough balls. Place these in your warm, buttered pan with space between them for rising.
Step 9: Final Rising in Warm Oven
Cover the rolls with a towel and place them in the turned-off, warm oven for 15 minutes to gently rise. Monitor the oven temperature to keep it warm but not hot enough to start baking.
Step 10: Finish Rising and Bake
Remove the rolls from the oven to a warm spot while you bring the oven back to 375 degrees. Once preheated, return the rolls to bake for about 12 minutes until golden brown and the center registers at least 190 degrees Fahrenheit. Immediately brush with butter for that irresistible sheen and flavor.
How to Serve One Hour Quick Dinner Rolls Recipe
Garnishes
While these rolls are perfect on their own with a pat of butter, you can elevate them with a sprinkle of flaky sea salt just after baking or a smear of homemade cinnamon honey butter. Fresh herbs or a dusting of garlic powder before baking also gives a delightful savory twist.
Side Dishes
These rolls pair wonderfully with hearty soups, roasted meats, or a fresh salad. Think comforting stews or a holiday roast where these rolls soak up all the rich, delicious juices on your plate.
Creative Ways to Present
For a crowd-pleasing presentation, serve the rolls stacked in a wicker basket lined with a warm, soft cloth napkin. Or arrange them on a wooden cutting board alongside an assortment of flavored butters and jams for a delightful appetizer spread.
Make Ahead and Storage
Storing Leftovers
Store any leftover rolls in an airtight container or zip-top bag at room temperature for up to two days. This keeps them soft and fresh for snacking or quick meals the next day.
Freezing
You can freeze these rolls once cooled completely. Wrap them tightly in plastic wrap and place in a freezer-safe bag for up to three months. Thaw overnight on the counter or warm in the oven directly from frozen for best results.
Reheating
Warm leftover or thawed rolls in a 300-degree oven for about 10 minutes wrapped in foil to refresh their softness and buttery flavor. Alternatively, a quick microwave heating wrapped in a damp paper towel works well for a fast fix.
FAQs
Can I use instant yeast instead of active dry yeast?
Yes, you can swap instant yeast for active dry yeast. Just skip the proofing with warm water and sugar since instant yeast is designed to be mixed directly with dry ingredients.
Why are my dinner rolls dense instead of fluffy?
Dense rolls often result from using too much flour or not allowing enough rising time. Make sure to measure flour carefully and give the dough enough rest and rise time as per the recipe.
Can I substitute milk for a dairy-free alternative?
Absolutely! Plant-based milks like almond, oat, or soy milk work well here. Just warm them to the same temperature as dairy milk to activate the yeast properly.
Do I need to use shortening, or can I substitute butter?
You can substitute butter for shortening; it will add a richer flavor but might slightly change the texture, making the rolls a bit denser. Both work, so feel free to use what you have on hand.
How should I store leftover rolls to keep them fresh?
The best way to keep leftover rolls fresh is to store them in an airtight container at room temperature for a couple of days. For longer storage, freeze them wrapped tightly.
Final Thoughts
I can’t recommend this One Hour Quick Dinner Rolls Recipe enough when you want fresh-baked bread without the wait. These rolls are a true game-changer for busy cooks and bread lovers alike—soft, buttery, and perfectly golden in just about an hour. So grab your ingredients, roll up your sleeves, and get ready to fall in love with the fastest homemade rolls you’ll ever bake. Your next meal just got a whole lot better!
Print
One Hour Quick Dinner Rolls Recipe
- Prep Time: 15 minutes
- Cook Time: 12 minutes
- Total Time: 1 hour
- Yield: 12 rolls
- Category: Bread
- Method: Baking
- Cuisine: American
Description
These One Hour Quick Dinner Rolls are soft, tender, and perfect for a fast homemade bread fix. Using active dry yeast and a quick rising method, you can have fresh, golden dinner rolls ready in just about an hour, making them ideal for last-minute dinners or special occasions.
Ingredients
Yeast Mixture
- 3 tablespoons warm water (105-110°F)
- 1 tablespoon active dry yeast
- 1 teaspoon sugar (to activate yeast)
Dough
- 3 tablespoons sugar
- 1 teaspoon kosher salt
- 3 tablespoons shortening
- 3/4 cup warm milk (105-110°F)
- 1 large egg
- 2 1/2 cups all-purpose flour (spooned and leveled)
For Pan & Finishing
- 1 tablespoon butter (to grease pan)
- 1 tablespoon butter (to brush on finished rolls)
Instructions
- Proof the yeast: In a small bowl or coffee mug, add 3 tablespoons warm water (lukewarm, 105-110°F). Stir in 1 tablespoon active dry yeast and 1 teaspoon sugar. Let sit for 5 minutes until the yeast dissolves and bubbles appear.
- Make the dough base: In a large bowl or stand mixer, combine 3 tablespoons sugar, 1 teaspoon kosher salt, 3 tablespoons shortening, and 1 cup of the flour.
- Add warm milk: Warm 3/4 cup milk in the microwave in 30-second increments until warm but not hot (105-110°F). Add to the flour mixture and stir or beat with a paddle attachment until combined.
- Incorporate yeast: Add the bubbly yeast mixture to the flour mixture and mix well.
- Add egg: Beat in 1 large egg thoroughly until combined.
- Add remaining flour: Gradually add remaining flour in increments, mixing between additions, until dough is smooth, soft, and slightly sticky but not pulling away completely from bowl sides. Use judgment to avoid over-flouring.
- Knead the dough: Using dough hook in a stand mixer, knead for 5 minutes; if kneading by hand, do so on a floured surface for about 8 minutes. Dough will still be sticky.
- Rest dough: Scrape dough onto a floured work surface, shape into a ball, and cover with a clean tea towel. Let rest for 5-10 minutes.
- Prepare pan: Preheat oven to 375°F for 2-3 minutes. Add 1 tablespoon butter to a 10-inch cast iron skillet or 9×13 inch baking pan and place in oven until butter melts and pan is hot. Turn oven off. Using a pastry brush, swirl butter to coat entire interior including sides. Keep pan in warm oven until ready.
- Shape rolls: Deflate dough by pressing down, remove air bubbles, and divide into 12 equal pieces (~2 oz each). Shape each piece by rounding one side and pinching the opposite side. Place shaped rolls pinched-side down in hot buttered pan with space between.
- First rise: Cover rolls with a tea towel and place in the turned-off oven. If oven rack is warm but not hot enough to burn finger, close oven door; if too hot, leave door slightly open to cool. Let rise 15 minutes.
- Continue rising: Remove rolls from oven, keep covered, and let continue rising in a warm place for another 10-15 minutes while preheating oven back to 375°F. Rolls should double in size, total rise time about 25 minutes.
- Bake rolls: Remove towel and bake rolls at 375°F for about 12 minutes until tops are deep golden brown. Internal temperature should reach at least 190°F.
- Butter the rolls: Immediately after baking, brush 1 tablespoon melted butter over the tops using a pastry brush.
- Rest and serve: Let rolls cool for about 5 minutes before serving. Enjoy warm with plenty of butter or cinnamon honey butter for extra indulgence.
Notes
- Warm liquids should be between 105-110°F to activate yeast without killing it.
- Use a stand mixer with a dough hook for easier kneading, or knead by hand on a floured surface if preferred.
- Don’t over-flour the dough; slightly sticky dough produces softer rolls.
- Butter the pan thoroughly to prevent sticking and add flavor.
- Ensure rolls rise in a warm but not hot oven to prevent premature baking.
- Check internal temperature of rolls with a thermometer to confirm doneness.
- Rolls are best enjoyed fresh but can be stored in an airtight container for 1-2 days.


