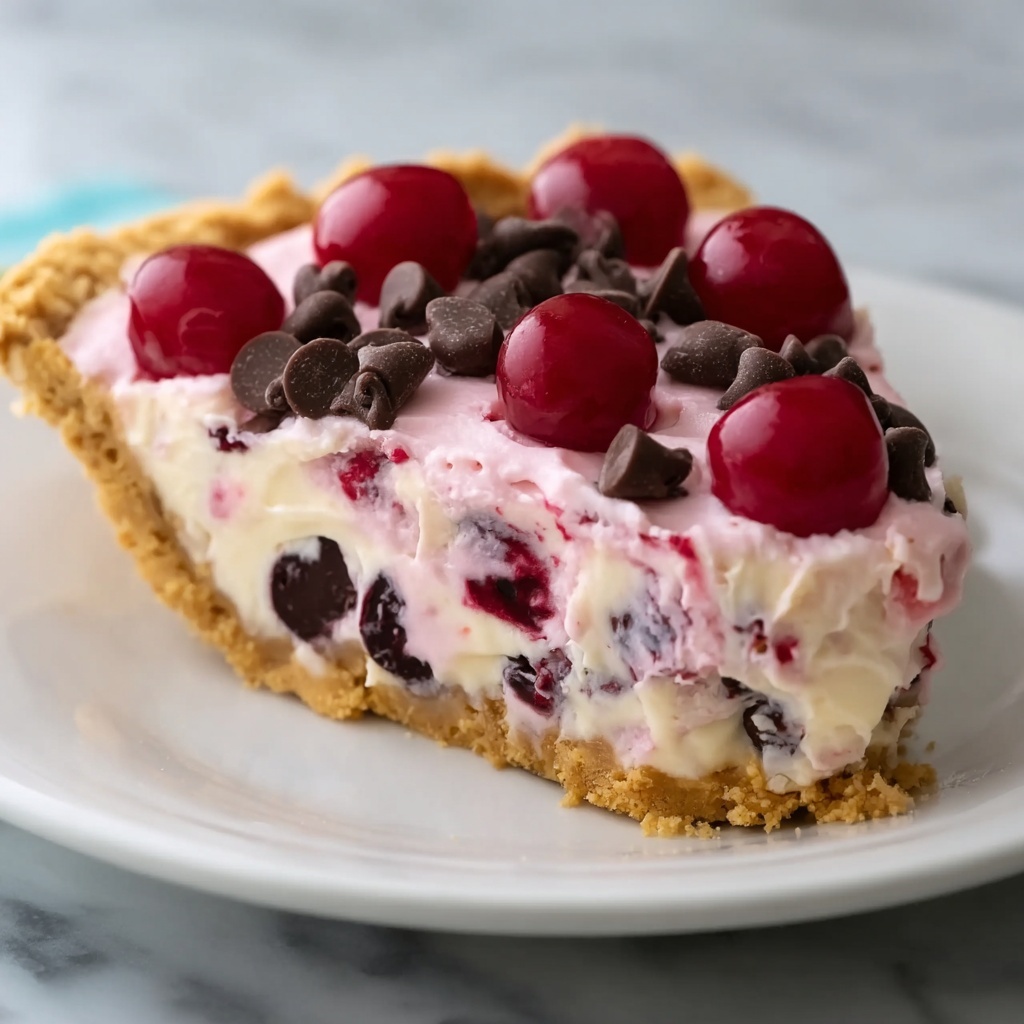
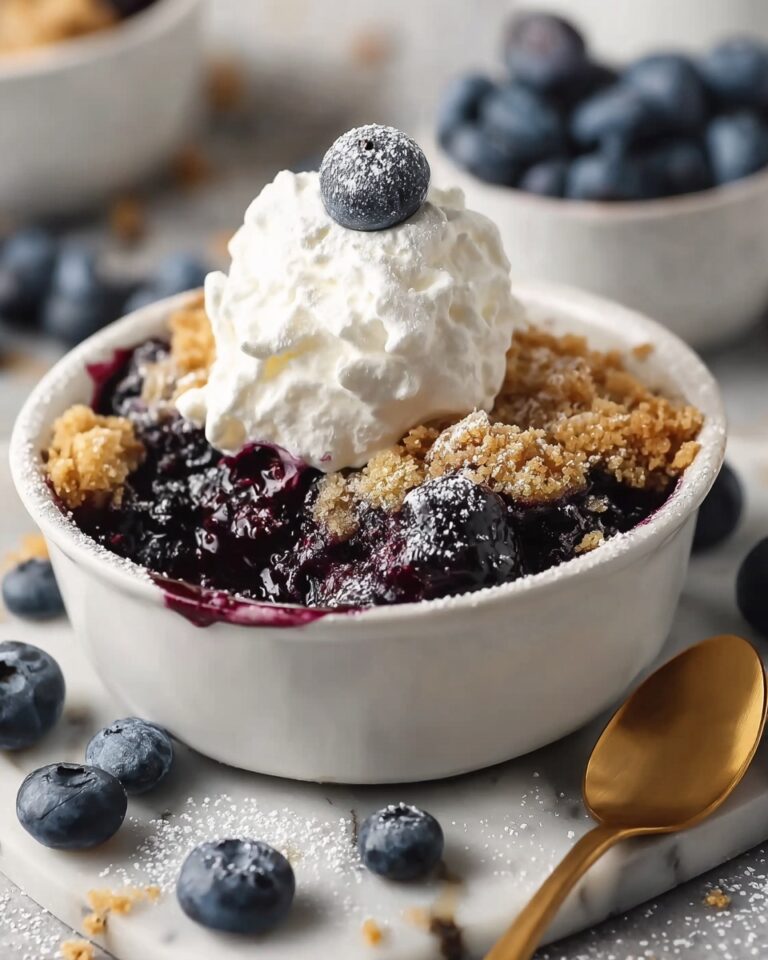
If you have a sweet tooth and love quick, fuss-free desserts, this No-Bake Easy Cherry Chocolate Chip Pie Recipe is the absolute game changer you need in your kitchen. Creamy, dreamy, with the perfect balance of luscious cherry filling and melty chocolate chips tucked inside a buttery graham cracker crust, every slice feels like a celebration. The beauty of this pie is that it requires no oven time, so you can whip it up effortlessly and impress your friends and family with a stunning dessert that tastes as incredible as it looks.
Ingredients You’ll Need
The magic of this pie lies in its simple ingredients, each bringing something special to the table. From the crunchy graham cracker base to the fluffy whipped cream, every component contributes to a delightful texture and flavor harmony that makes this no-bake pie irresistible.
- 1 1/2 cups graham cracker crumbs: For that perfect crunchy, buttery crust foundation.
- 1/2 cup melted unsalted butter: Binds the crust and adds rich, buttery flavor.
- 1/4 cup granulated sugar: Sweetens the crust just enough to balance the tangy cherries.
- 8 oz cream cheese, softened: Brings smoothness and creaminess to the filling.
- 1/2 cup powdered sugar: Adds sweetness with a velvety texture to the filling.
- 1 tsp vanilla extract: Infuses a warm aroma and depth of flavor.
- 1 1/2 cups heavy whipping cream, whipped to stiff peaks: Provides a light, fluffy texture that melts in your mouth.
- 1 cup mini chocolate chips: Offers sweet bursts of chocolate throughout the pie.
- 1 can (21 oz) cherry pie filling: The star ingredient, bringing bright, juicy bursts of cherry goodness.
- Extra mini chocolate chips for garnish: Adds a pretty finishing touch and extra chocolate hit.
- Whipped cream for serving (optional): For a cloud-like topping that’s pure indulgence.
How to Make No-Bake Easy Cherry Chocolate Chip Pie Recipe
Step 1: Prepare the Crust
Grab a medium bowl and mix together those graham cracker crumbs, melted butter, and granulated sugar until everything is well combined. This mixture is what will deliver a wonderfully firm yet tender crust to hold all that delicious filling.
Step 2: Press the Crust
Firmly press the crust mixture into the bottom and along the sides of a 9-inch pie pan. Taking your time here ensures a compact crust that will hold its shape when sliced.
Step 3: Chill the Crust
Pop the crust into the fridge for 15 to 20 minutes. This chilling step is essential so that the crust sets properly and doesn’t crumble when you add the filling.
Step 4: Make the Filling
Using a large mixing bowl, beat the softened cream cheese until it’s perfectly smooth and creamy. This is the base of your luscious filling, so getting it silky smooth is key.
Step 5: Add Sweetness and Flavor
Mix in powdered sugar and vanilla extract until everything is combined into one velvety mixture. The vanilla adds a lovely aroma that elevates this pie to something truly special.
Step 6: Fold in Whipped Cream
Gently fold in the whipped cream with care to keep the airy texture intact. This step transforms the filling into a light, fluffy delight that melts on your tongue.
Step 7: Add Chocolate Chips
Fold in the mini chocolate chips, spreading them evenly throughout the filling so that every bite has just the right touch of chocolate surprise.
Step 8: Assemble the Pie
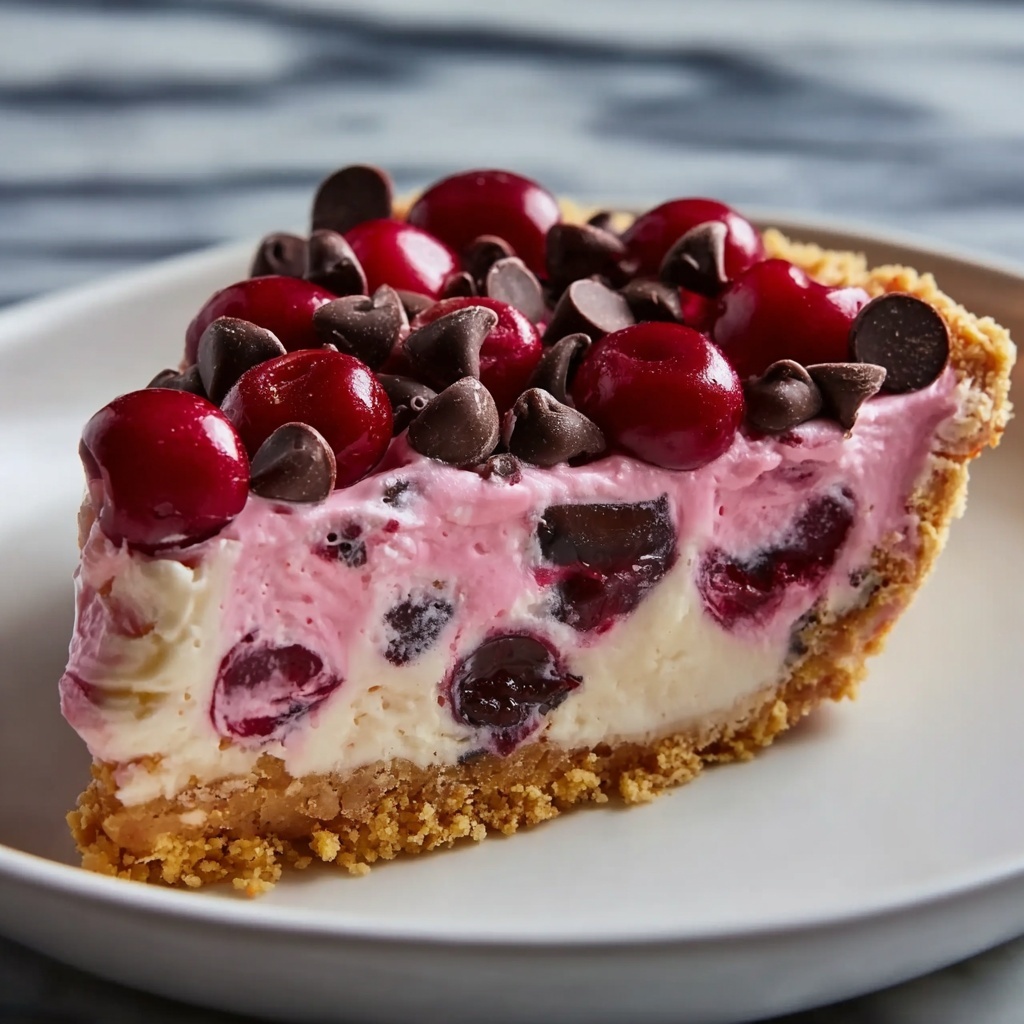
Spoon half the cream cheese filling into your chilled crust and spread it out evenly, creating a smooth, creamy base layer.
Step 9: Add the Cherry Layer
Spoon dollops of the cherry pie filling over the cream cheese layer. Save a few cherries for garnish — they add a gorgeous pop of color to your finished pie.
Step 10: Top with Remaining Filling
Lay down the remaining cream cheese mixture on top of the cherries, making sure it’s smooth for that perfect finish.
Step 11: Chill Until Set
Refrigerate the assembled pie for at least 3 to 4 hours, allowing it to set completely. Patience here pays off with a slice that holds together beautifully and tastes divine.
Step 12: Add Final Touches
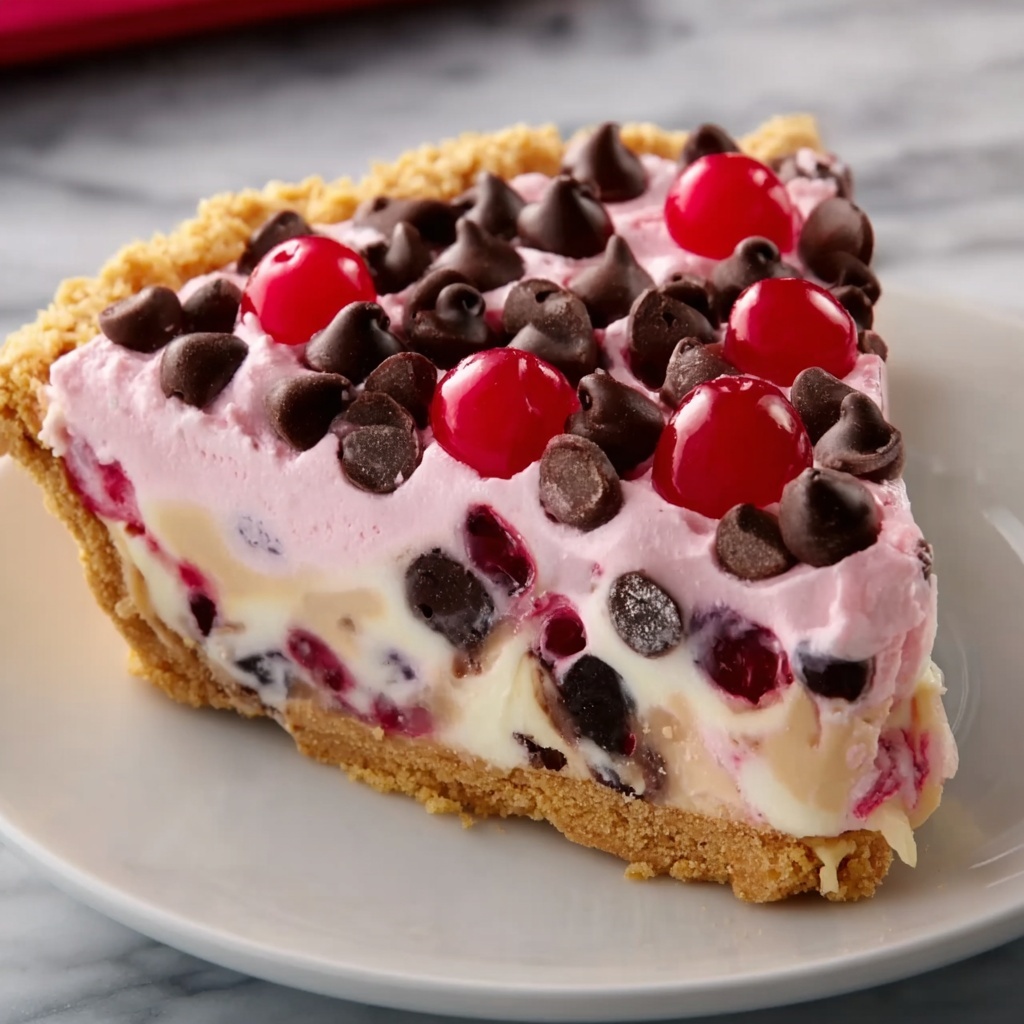
Before serving, sprinkle a handful of extra mini chocolate chips on top for that irresistible final chocolate kiss.
Step 13: Garnish and Serve
Add a dollop of whipped cream alongside a few reserved cherries. This not only looks gorgeous but adds an extra layer of creaminess and freshness.
Step 14: Slice and Enjoy!
Cut yourself a generous slice and savor the combination of creamy cherry and chocolate chips in every bite. It’s pure happiness on a plate.
How to Serve No-Bake Easy Cherry Chocolate Chip Pie Recipe
Garnishes
Extra mini chocolate chips and plump cherries make for stunning garnishes that add texture and vibrant color. You can also swirl in some whipped cream for a soft, pillowy topping that invites you to dig right in.
Side Dishes
This pie pairs beautifully with a scoop of vanilla ice cream or a simple fresh fruit salad. Both add refreshing elements that contrast nicely with the rich, creamy pie.
Creative Ways to Present
Try serving this pie in individual clear glasses for a layered parfait effect or garnish each slice with chopped toasted nuts for added crunch and visual appeal. It’s easy to make it special for any occasion!
Make Ahead and Storage
Storing Leftovers
Store any leftover pie in an airtight container or cover it tightly with plastic wrap in the refrigerator. It will keep well for up to 3 days, maintaining that creamy texture and fresh cherry flavor.
Freezing
You can freeze this pie for up to a month. Wrap it securely in plastic wrap and foil to prevent freezer burn, then thaw overnight in the fridge before serving to preserve its perfect texture.
Reheating
No reheating is needed for this pie since it’s best enjoyed chilled. Let it thaw in the refrigerator if it’s been frozen and then serve for a refreshing, cool dessert.
FAQs
Can I use fresh cherries instead of canned cherry pie filling?
Absolutely! Fresh cherries will add a wonderful natural flavor, just cook them down with a bit of sugar and cornstarch to replicate that jammy consistency.
Is it possible to make this pie vegan or dairy-free?
Yes, you can substitute cream cheese and heavy cream with plant-based alternatives like vegan cream cheese and coconut whipped cream, though the flavor and texture might be slightly different.
How long does it take for the pie to set properly?
Chilling the pie for at least 3 to 4 hours is essential to ensure the filling firms up perfectly and the flavors meld together beautifully.
Can I use crushed cookies instead of graham cracker crumbs?
Definitely! Crushed chocolate cookies or even digestive biscuits can be fantastic alternatives, each offering a unique twist on the crust’s flavor.
What’s the best way to get perfectly whipped cream?
Use cold heavy cream and a chilled bowl, then whip at medium-high speed until stiff peaks form. This creates the lightest, fluffiest whipped cream that holds up well in the filling.
Final Thoughts
This No-Bake Easy Cherry Chocolate Chip Pie Recipe is a true crowd-pleaser that brings joy with every bite. Its effortless preparation and sensational flavors make it a staple for any dessert lover’s repertoire. Once you try this, you’ll keep coming back to it for birthdays, potlucks, or whenever your sweet cravings strike!
Print
No-Bake Easy Cherry Chocolate Chip Pie Recipe
- Prep Time: 30 minutes
- Cook Time: 0 minutes
- Total Time: 3 hours 30 minutes
- Yield: 8 servings
- Category: Dessert
- Method: No-Cook
- Cuisine: American
- Diet: Vegetarian
Description
This No-Bake Easy Cherry Chocolate Chip Pie is a luscious and creamy dessert that combines a buttery graham cracker crust with a smooth cream cheese filling studded with mini chocolate chips and topped generously with sweet cherry pie filling. Perfect for gatherings or a simple indulgence, this pie requires no oven time and comes together quickly with a chilling period to set.
Ingredients
Crust
- 1 1/2 cups graham cracker crumbs
- 1/2 cup melted unsalted butter
- 1/4 cup granulated sugar
Filling
- 8 oz cream cheese, softened
- 1/2 cup powdered sugar
- 1 tsp vanilla extract
- 1 1/2 cups heavy whipping cream, whipped to stiff peaks
- 1 cup mini chocolate chips
Topping & Garnish
- 1 can (21 oz) cherry pie filling
- Extra mini chocolate chips for garnish
- Whipped cream for serving (optional)
Instructions
- Prepare the Crust: In a medium bowl, combine the graham cracker crumbs, melted unsalted butter, and granulated sugar. Mix well until the crumbs are fully moistened and resemble wet sand.
- Form the Crust: Press the crumb mixture firmly and evenly into the bottom and up the sides of a 9-inch pie pan to create a compact crust layer.
- Chill the Crust: Place the crust in the refrigerator for 15-20 minutes to firm up while preparing the filling.
- Beat Cream Cheese: In a large mixing bowl, beat the softened cream cheese until smooth and creamy to avoid lumps.
- Add Sweetness and Flavor: Mix in the powdered sugar and vanilla extract until fully incorporated and the mixture is uniform.
- Fold in Whipped Cream: Gently fold the whipped heavy cream into the cream cheese mixture, using a spatula to keep the texture light and fluffy.
- Add Chocolate Chips: Stir in the mini chocolate chips evenly throughout the filling to add bursts of chocolate in each bite.
- Assemble First Layer: Spoon half of the cream cheese filling into the chilled crust and spread it out evenly with a spatula.
- Add Cherry Pie Filling: Spoon a layer of cherry pie filling over the cream cheese layer, reserving a few cherries to garnish the top.
- Top with Remaining Filling: Spread the remaining cream cheese mixture over the cherry layer smoothly.
- Refrigerate to Set: Refrigerate the assembled pie for at least 3 to 4 hours, allowing it to fully set and flavors to meld.
- Garnish Before Serving: Sprinkle extra mini chocolate chips on top of the chilled pie for decoration.
- Add Final Touches: Add a dollop of whipped cream and a few reserved cherries on top to create an inviting presentation.
- Slice and Serve: Cut the pie into 8 generous slices and enjoy this creamy cherry and chocolate chip delight.
Notes
- For best results, ensure the cream cheese is softened to room temperature to avoid lumps in the filling.
- You can substitute mini chocolate chips with regular chocolate chips if preferred, but mini chips blend better into the filling.
- This pie should be kept refrigerated and is best enjoyed within 2 days for optimal freshness.
- If you prefer a firmer crust, consider adding a tablespoon of melted butter more.
- Whipped cream for serving is optional but adds a nice lightness on top.
- No baking is required, making this an easy dessert for warm weather or last-minute gatherings.


