
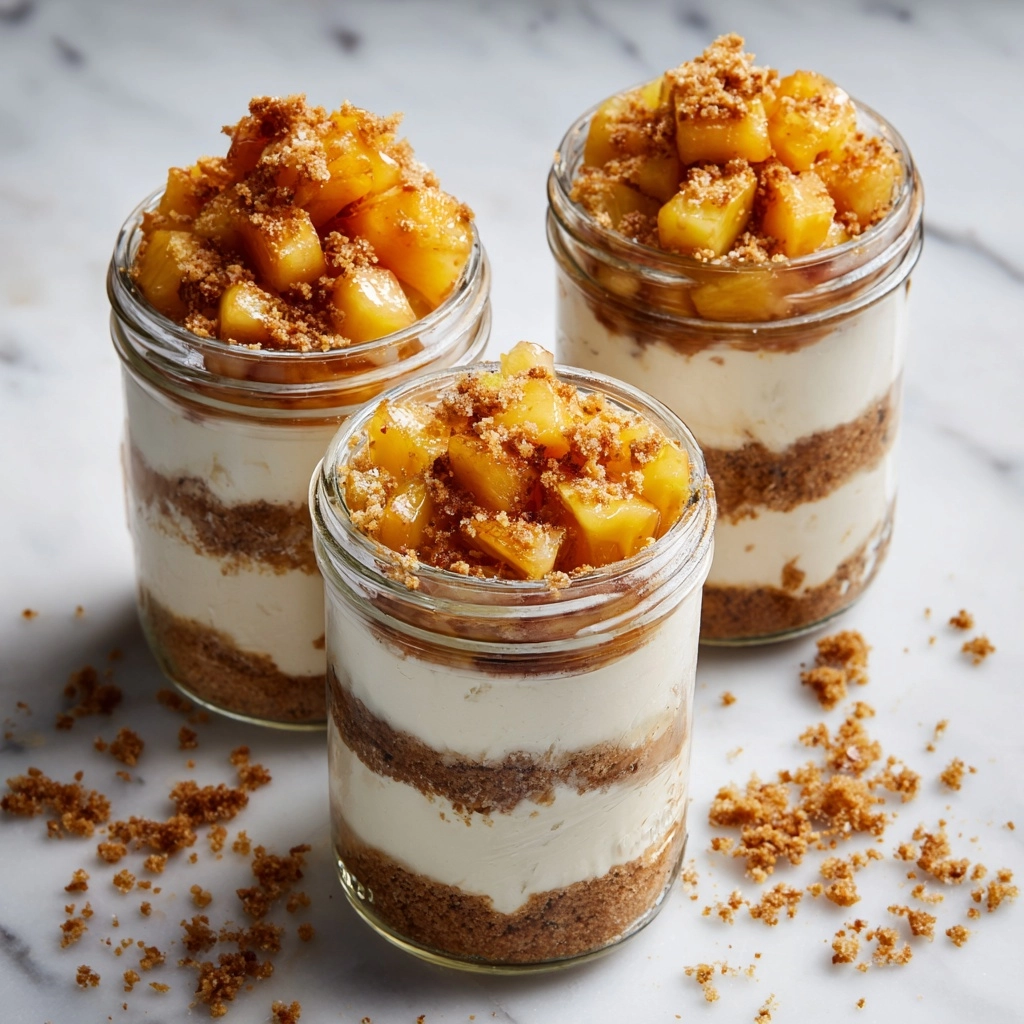
If you love the cozy flavors of fall desserts and crave something both charming and effortless, you will absolutely adore this No-Bake Apple Cheesecake Jars Recipe. It layers buttery graham cracker crust, creamy cheesecake filling, and luscious apple topping all in a cute jar, making it perfect for any occasion. Whether you’re hosting a casual get-together or simply want a quick homemade treat, this no-bake dessert delivers on taste and presentation without tying you to the oven. Trust me, these jars bring all the comfort and sweetness with minimal fuss and maximum delight.
Ingredients You’ll Need
The magic behind this No-Bake Apple Cheesecake Jars Recipe lies in its simple yet essential ingredients. Each component adds its own unique texture, flavor, and character—creating a perfectly balanced dessert that’s creamy, crunchy, and fruity all at once.
- Graham cracker crumbs (1 cup): Provides a sweet, crunchy base that forms the crust so every bite has that delightful snap.
- Melted butter (3 tablespoons): Binds the crumbs together and adds a rich, buttery flavor essential for the crust.
- Brown sugar (2 tablespoons): Adds warmth and caramel notes to complement the apples beautifully.
- Cream cheese, softened (8 oz): The star ingredient for that classic, velvety cheesecake texture and tangy taste.
- Greek yogurt or sour cream (½ cup): Balances the richness with slight acidity and adds creaminess without heaviness.
- Powdered sugar (⅓ cup): Sweetens the filling smoothly without any graininess.
- Vanilla extract (1 teaspoon): Enhances all the flavors with its warm, floral notes.
- Apple pie filling or sautéed cinnamon apples (1 cup): The delicious fruit topping that brings freshness and spice to every spoonful.
- Whipped cream and cinnamon (optional): Perfect for a finishing touch that adds extra creaminess and cozy flavor.
How to Make No-Bake Apple Cheesecake Jars Recipe
Step 1: Prepare the Crust
Start by mixing the graham cracker crumbs, melted butter, and brown sugar in a small bowl until the mixture looks like wet sand. This texture ensures the crust will hold together nicely once pressed, giving each jar that perfectly textured base. Divide this mixture evenly among your jars or cups and gently press down to form the crust layer. It’s the foundation for this treat so take a moment to get it nicely packed but not crushed.
Step 2: Make the Cheesecake Filling
In a medium bowl, beat the softened cream cheese until smooth and creamy. This step is important to avoid lumps and get the filling silky. Then add your Greek yogurt or sour cream, powdered sugar, and vanilla extract. Beat again until everything is fully combined and fluffy. This rich, smooth filling is what transforms this dessert into something truly special and indulgent.
Step 3: Assemble the Jars
Spoon or use a piping bag to carefully layer the cheesecake filling over the crust in each jar. Even layers make for a visually stunning dessert and help balance flavors in every bite. Next, top each jar with a generous spoonful of apple pie filling or your homemade sautéed cinnamon apples. The fruity warmth and spices are the perfect complement to the tangy cheesecake layer.
Step 4: Chill Before Serving
Cover the jars and refrigerate for at least 1 hour to let everything set and meld flavors. This chilling step is key for that creamy, sliceable cheesecake texture, even though this recipe requires no baking. When ready to serve, add optional whipped cream and a dusting of cinnamon for the ultimate cozy touch.
How to Serve No-Bake Apple Cheesecake Jars Recipe

Garnishes
Adding a dollop of freshly whipped cream and a light sprinkle of cinnamon or nutmeg instantly amps up the flavor and presentation. A few toasted nuts or a caramel drizzle could also add wonderful texture and balance the creamy richness.
Side Dishes
This dessert pairs beautifully with a hot cup of spiced apple cider or a bold black coffee. If you want to add a savory note to your dessert course, try light cheese and fruit platters or nutty snacks to contrast the sweet, creamy jars.
Creative Ways to Present
Try layering the jars with little cinnamon sticks or star anise tucked in as natural stirrers. Using mason jars with rustic lids or mini mason jars for single bites makes these a charming treat for parties or holiday gatherings. Personalize the jars with name tags for a sweet, thoughtful touch.
Make Ahead and Storage
Storing Leftovers
These cheesecake jars keep beautifully in the refrigerator for up to 2 days. Store them tightly covered with lids or plastic wrap to maintain freshness and prevent the apples from drying out. They remain just as delightful when enjoyed cold straight from the fridge.
Freezing
While not ideal for freezing due to texture changes in cream cheese and apples, you can freeze the cheesecake filling separately if needed, then thaw and assemble the jars fresh. The crust and apples are best fresh or refrigerated for optimal taste and texture.
Reheating
This No-Bake Apple Cheesecake Jars Recipe is meant to be enjoyed chilled, so reheating is not recommended. Serve straight from the refrigerator for the best creamy and refreshing experience every time.
FAQs
Can I use regular yogurt instead of Greek yogurt?
Yes, you can use regular yogurt, though Greek yogurt’s thicker consistency gives a creamier texture which helps the cheesecake filling hold up better in the jars.
What can I substitute for graham cracker crumbs?
Digestive biscuits, vanilla wafers, or even crushed pretzels can be delicious alternatives to graham cracker crumbs, adding their own unique flavor twists.
Is it possible to make this dessert vegan?
To make it vegan, substitute cream cheese and yogurt with plant-based versions and use vegan butter or coconut oil for the crust. Just be mindful that texture and flavor may vary slightly.
How long can I prepare these jars in advance?
You can assemble these jars up to 2 days ahead and store them covered in the refrigerator to save time while keeping flavors fresh.
Can I make the apple topping from scratch?
Absolutely! Sauté diced apples with butter, brown sugar, and cinnamon until soft and fragrant for a homemade touch that tastes incredible and complements the cheesecake perfectly.
Final Thoughts
This No-Bake Apple Cheesecake Jars Recipe is hands down one of my favorite quick desserts that tastes like you spent hours in the kitchen. It’s creamy, fruity, and perfectly spiced with an easy-to-love presentation that never fails to impress. Whether you’re treating yourself or crowd-pleasing at your next gathering, these jars deliver cozy comfort with minimal effort. Give them a try—you’ll want to keep this recipe close all year round!
Print
No-Bake Apple Cheesecake Jars Recipe
- Prep Time: 15 minutes
- Cook Time: 0 minutes
- Total Time: 15 minutes plus at least 1 hour chilling
- Yield: 4 jars
- Category: Dessert
- Method: No-Cook
- Cuisine: American
- Diet: Vegetarian
Description
These No-Bake Apple Cheesecake Jars offer a delightful and easy way to enjoy a creamy cheesecake layered with a buttery graham cracker crust and topped with sweet, spiced apple pie filling. Perfect for a quick dessert or fall treat, these jars are perfect for individual servings and require no baking.
Ingredients
Crust
- 1 cup graham cracker crumbs
- 3 tablespoons melted butter
- 2 tablespoons brown sugar
Filling
- 8 oz cream cheese, softened
- ½ cup Greek yogurt or sour cream
- ⅓ cup powdered sugar
- 1 teaspoon vanilla extract
Topping
- 1 cup apple pie filling or sautéed cinnamon apples
- Whipped cream, for topping (optional)
- Cinnamon, for topping (optional)
Instructions
- Prepare the crust: In a small bowl, mix graham cracker crumbs, melted butter, and brown sugar until the mixture resembles wet sand. Divide the crust mixture evenly among 4 small jars or cups, pressing down gently to form an even crust layer at the bottom.
- Make the cheesecake filling: In a medium bowl, beat the softened cream cheese until smooth and creamy. Add Greek yogurt (or sour cream), powdered sugar, and vanilla extract. Continue beating until the mixture is well combined and creamy.
- Assemble the jars: Spoon or pipe the cheesecake filling evenly over the crust layer in each jar, smoothing the tops gently to create an even layer.
- Add the apple topping: Place a generous spoonful of apple pie filling or sautéed cinnamon apples on top of the cheesecake layer in each jar.
- Chill: Cover the jars and refrigerate for at least 1 hour to allow the flavors to meld and the filling to set properly.
- Serve: Before serving, optionally top each jar with whipped cream and a sprinkle of cinnamon for added flavor and presentation.
Notes
- For a homemade apple topping, sauté 2 chopped apples with 1 tablespoon butter, 1 tablespoon brown sugar, and ½ teaspoon cinnamon until soft and caramelized.
- These cheesecake jars can be prepared up to 2 days in advance and stored covered in the refrigerator to save time.
- Use Greek yogurt for a tangier flavor or sour cream for a richer texture, depending on preference.
- Make sure the cream cheese is softened to ensure a smooth and creamy filling without lumps.

