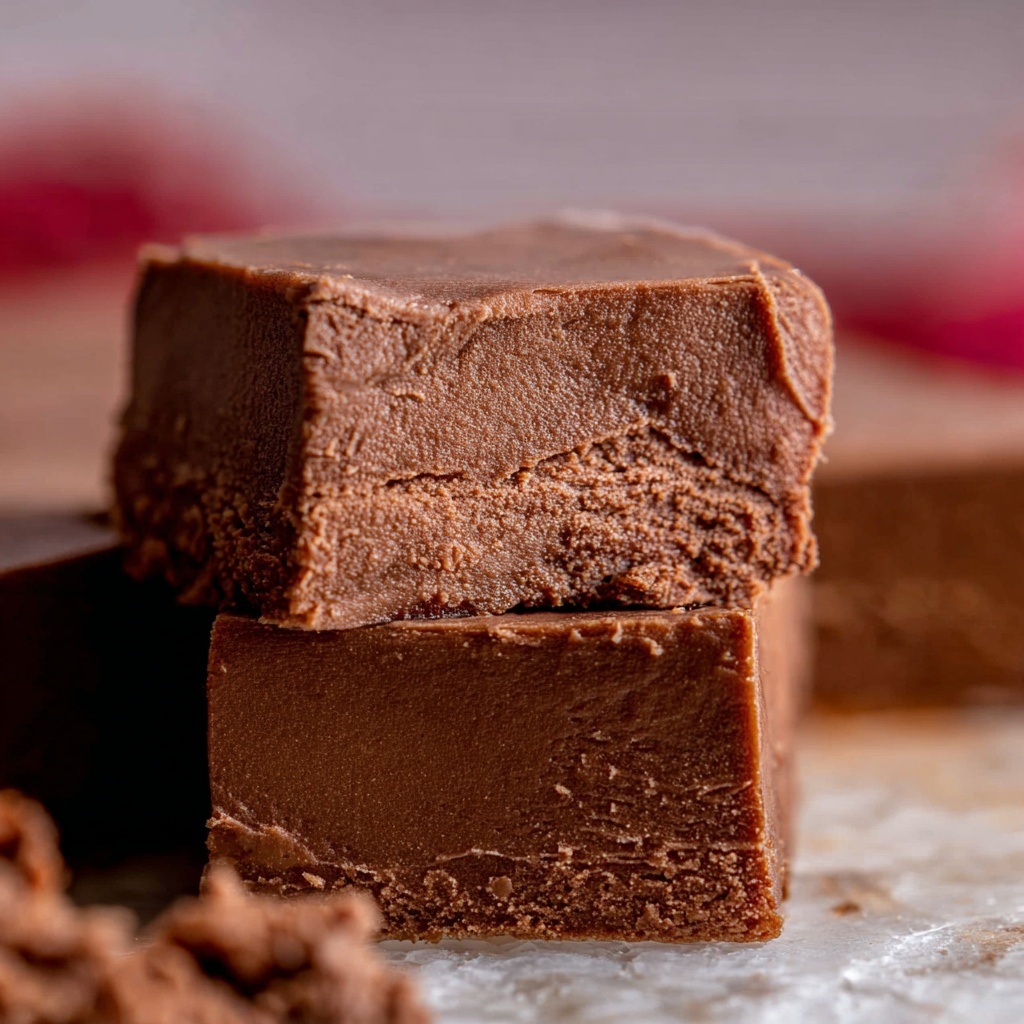
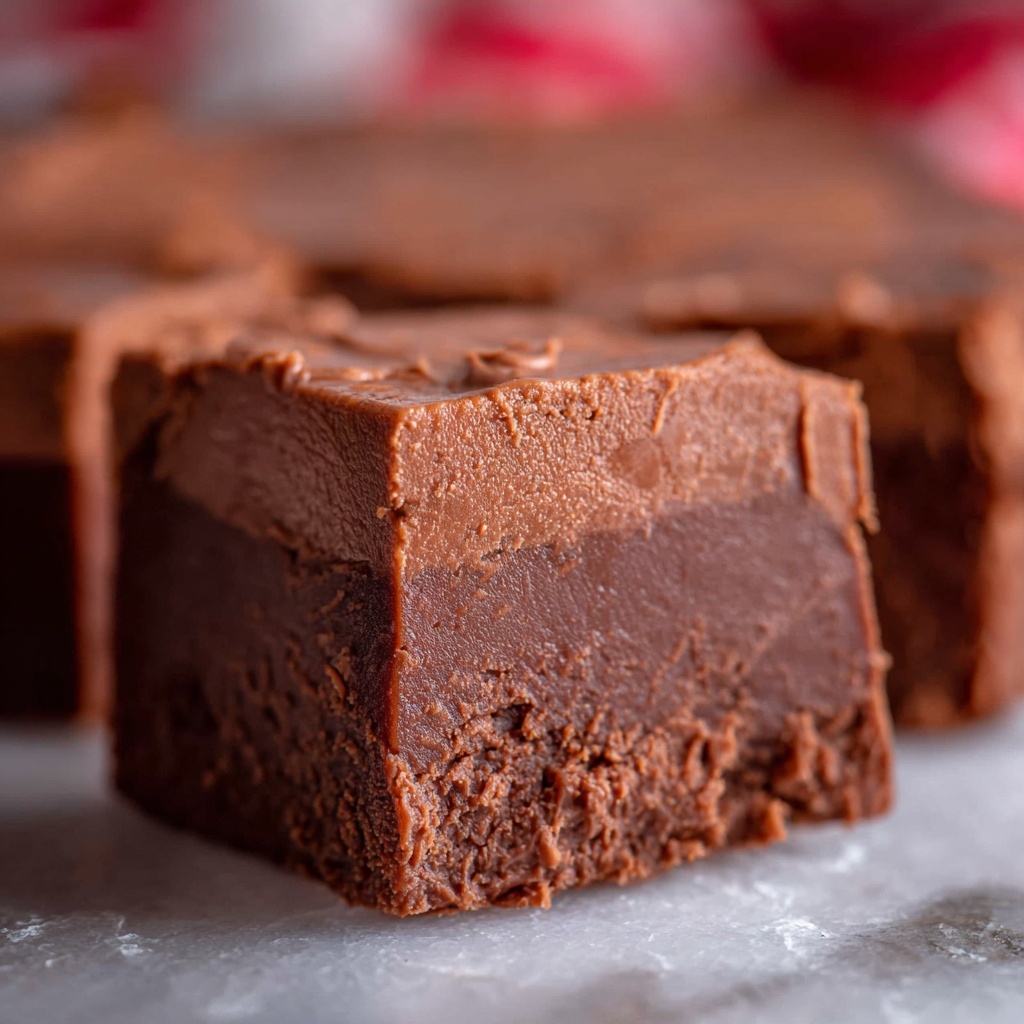
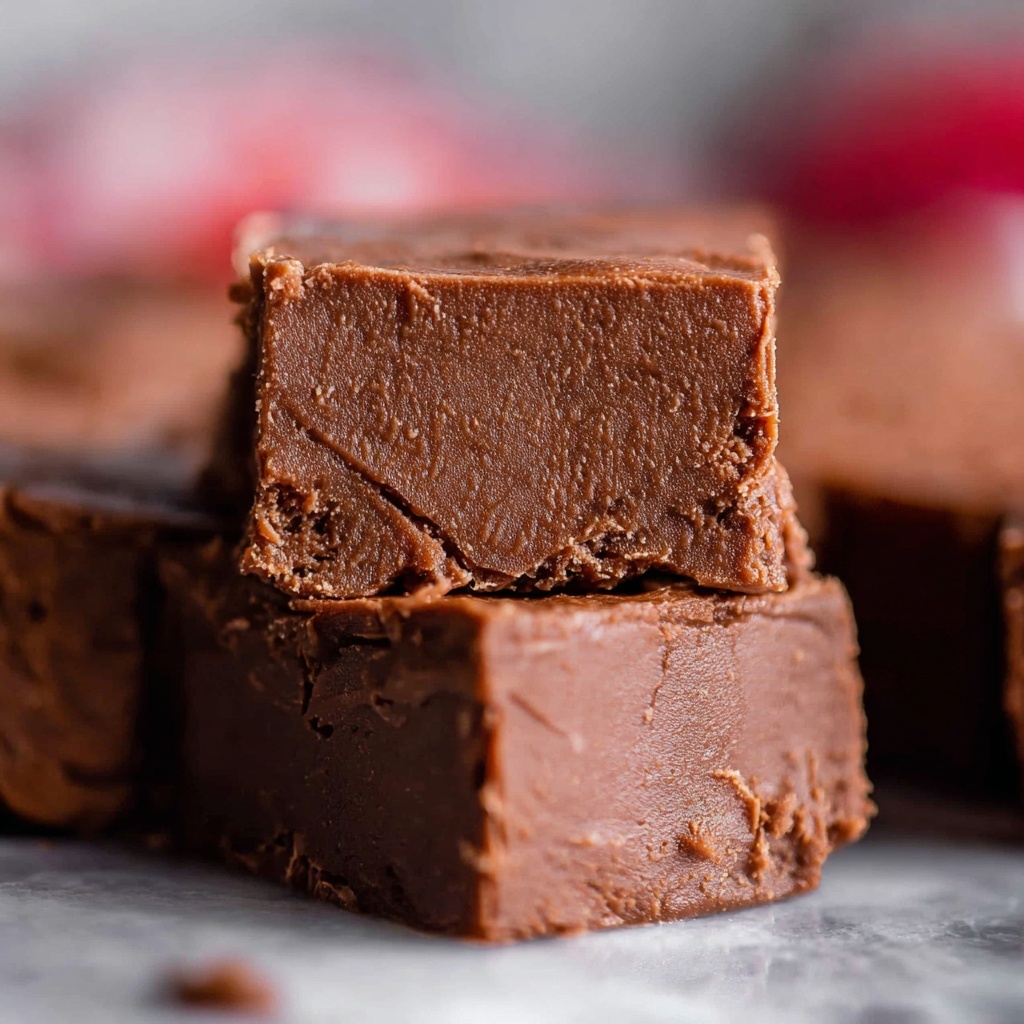
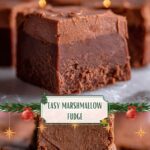
If there is one nostalgic treat that brings back the sweetest memories of family gatherings and holiday cheer, it is undoubtedly Mom’s Marshmallow Fudge Recipe. This classic delight is a luscious combination of creamy chocolate, velvety marshmallow creme, and just the right hint of vanilla, all melting together into an irresistible fudge that’s both rich and perfectly smooth. Whether you’re looking to impress guests or simply indulge in a comforting homemade confection, this recipe promises to deliver that perfect balance of melt-in-your-mouth texture and nostalgic flavor that only Mom’s kitchen magic can create.
Ingredients You’ll Need
Gathering simple ingredients is key for making Mom’s Marshmallow Fudge Recipe shine. Each component plays an essential role, from the creamy butter that lays a rich foundation, to the high-quality semi-sweet chocolate chips that bring depth, and the marshmallow creme which lends a light, airy sweetness and that signature smooth texture.
- 3/4 cup butter: Use real butter, not margarine, for rich flavor and creamy texture.
- 2 & 1/2 cups white granulated sugar: The sweet backbone of the fudge that must dissolve fully to avoid graininess.
- 2/3 cup full-fat evaporated milk: Adds smoothness and helps the fudge reach the perfect consistency without being overly sweet.
- 12-ounce package semi-sweet chocolate chips: Choose high-quality chips for deep, chocolatey flavor and easy melting.
- 7-ounce jar marshmallow cream (marshmallow fluff): The secret ingredient that keeps this fudge irresistibly soft and luscious.
- 1 teaspoon vanilla extract: Rounds out the flavor with a warm, aromatic hint.
How to Make Mom’s Marshmallow Fudge Recipe
Step 1: Prepare Your Ingredients
Before you start boiling or stirring, make sure every ingredient is measured and prepped. Fudge-making moves quickly once the heat is on, so laying everything out beforehand is crucial to avoid any hiccups during cooking.
Step 2: Line Your Pan
Place parchment paper into an 8×8 or 9×9 inch pan, ensuring it covers the sides for easy removal later. This keeps your fudge from sticking and makes cleanup a breeze.
Step 3: Ready Your Chocolate and Marshmallow Cream
Open your bag of chocolate chips and remove the lid and foil seal from your marshmallow cream jar. Having these ready means no delays when it’s time to mix.
Step 4: Melt the Butter
In a heavy 3-quart saucepan over medium heat, melt the butter. Use a spoon to coat the sides of the pan with melted butter to prevent the sugar from crystallizing on the edges.
Step 5: Add Sugar Carefully
Slowly add the granulated sugar to the center of the pan, avoiding the pan’s sides. Stir gently to moisten the sugar without leaving any crystals on the spoon or pan, ensuring a smooth final fudge.
Step 6: Stir in Evaporated Milk
Pour in the evaporated milk and mix well, making sure all sugar crystals dissolve. This step sets the stage for a silky texture and prevents graininess.
Step 7: Bring to a Rolling Boil
Heat the mixture until it comes to a full rolling boil, then set a timer for 5 minutes, reducing the heat to medium. Stir constantly so it doesn’t burn, and watch the temperature rise to approximately 234-236°F for perfect fudge consistency.
Step 8: Melt in the Chocolate Chips
Remove the pan from heat and immediately stir in all the chocolate chips until the mixture is completely smooth without lumps, which ensures every bite is perfectly creamy.
Step 9: Add Marshmallow Creme
Warm the marshmallow cream briefly in the microwave for easy scooping, then add it to the chocolate mixture. Beat with a wooden spoon until the marshmallow is nearly blended in.
Step 10: Stir in Vanilla
Add vanilla extract and continue stirring until the fudge mixture is smooth and evenly blended, without any remaining marshmallow streaks. Stop as soon as it’s combined to maintain the right texture.
Step 11: Pour into Prepared Pan
Pour your liquid fudge into the parchment-lined pan, avoiding any dried bits clinging to the pot’s edges. Gently shake the pan to help settle the fudge; do not smooth the surface. The ripples give the fudge its classic rustic charm.
Step 12: Let Cool
Allow the fudge to cool completely at room temperature. This step is hard because it smells so good, but patience helps it set with the perfect texture.
Step 13: Slice and Serve
Cut the fudge into approximately 7×7 rows for 49 luscious pieces. Remember, fudge is rich, so these small squares are just right for savoring.
Step 14: Store Properly
Keep your fudge covered with plastic wrap at room temperature. Avoid refrigerating as it may harden the fudge. This method encourages the delightful temptation of sneaking a piece every time you pass by!
How to Serve Mom’s Marshmallow Fudge Recipe
Garnishes
Sprinkle a few mini marshmallows or shaved chocolate on top for an extra-special touch that amplifies the marshmallow-chocolate harmony in every bite.
Side Dishes
Pair your fudge with a cup of rich, dark coffee or a creamy hot cocoa to complement the sweetness and provide balance as you indulge.
Creative Ways to Present
Try presenting your fudge in a decorative tin lined with festive wax paper for gift-giving, or arrange bite-sized squares on a platter with colorful holiday sprigs or edible glitter for a party-ready display.
Make Ahead and Storage
Storing Leftovers
Keep leftover fudge on the countertop covered with plastic wrap or in an airtight container. It stays deliciously soft for up to two weeks without refrigeration.
Freezing
If you want to keep this treat longer, wrap pieces individually in wax paper and place them in a freezer-safe container. Frozen fudge can last up to 3 months—just thaw at room temperature before serving.
Reheating
Fudge is enjoyed best at room temperature with no reheating necessary. If it becomes too firm, simply let it sit out for 20-30 minutes to soften naturally.
FAQs
Can I substitute margarine for butter in Mom’s Marshmallow Fudge Recipe?
It’s best to use real butter rather than margarine. Butter adds essential creaminess and flavor that margarine can’t replicate in fudge, affecting both taste and texture.
What if I don’t have a candy thermometer?
While a candy thermometer is helpful for precision, you can check doneness by the 5-minute rolling boil guideline. Consistent stirring and timing are key, but a thermometer ensures perfect results every time.
Can I use different types of chocolate? For example, milk or dark chocolate?
Semi-sweet chocolate is recommended for the right balance of sweetness and richness. Using milk chocolate may make the fudge too sweet, while dark chocolate will intensify bitterness—feel free to experiment but expect flavor shifts.
Why do I have lumps in my fudge?
Lumps usually mean sugar crystals didn’t dissolve properly or chocolate chips weren’t fully melted. Make sure to stir thoroughly during cooking and add chocolate off heat to achieve a smooth mixture.
How long will this fudge stay fresh?
Stored properly at room temperature, the fudge stays fresh for up to two weeks, making it perfect for advance holiday prep or gifting.
Final Thoughts
There is truly nothing quite as heartwarming as making and sharing Mom’s Marshmallow Fudge Recipe. It captures all the cozy, sweet moments of family time in every bite. Whether you’re new to fudge making or a seasoned pro, this recipe is a delightful, simple way to bring a little magic into your kitchen and onto your dessert table. Give yourself the gift of this classic goodness and enjoy the smiles it will surely bring!
Print
Mom’s Marshmallow Fudge Recipe
- Prep Time: 5 minutes
- Cook Time: 5 minutes
- Total Time: 10 minutes
- Yield: Approximately 49 pieces
- Category: Dessert
- Method: Stovetop
- Cuisine: American
Description
This classic Mom’s Marshmallow Fudge recipe yields rich, smooth, and creamy fudge made with butter, sugar, evaporated milk, semi-sweet chocolate chips, marshmallow cream, and vanilla. Perfectly textured with a melt-in-your-mouth finish, this homemade fudge is an irresistible seasonal treat that can be prepared on the stovetop in just 10 minutes.
Ingredients
Fudge Base
- 3/4 cup butter (1 and 1/2 sticks; do not use margarine)
- 2 1/2 cups white granulated sugar
- 2/3 cup full-fat evaporated milk (do not use sweetened condensed milk)
- 12 ounce package (2 cups) high-quality semi-sweet chocolate chips
Mix-Ins
- 7 ounce jar marshmallow cream (marshmallow fluff)
- 1 teaspoon vanilla extract
Instructions
- Prepare Ingredients: Measure out and have all ingredients ready before heating anything. Fudge-making moves quickly and requires preparation.
- Line Pan: Line an 8×8 or 9×9 inch square baking pan with parchment paper; set aside for the fudge later.
- Prep Chocolate & Marshmallow: Open the bag of semi-sweet chocolate chips and remove the lid and foil seal from the marshmallow cream container. These will be added after boiling.
- Melt Butter: In a heavy 3-quart saucepan over medium heat, add butter and let it mostly melt. Use a spoon to grease the sides of the pan by dragging melted butter all the way up to the edges.
- Add Sugar: Carefully pour sugar into the center of the pan, avoiding sugar crystals on the sides. Gently bring butter toward sugar center with a wooden spoon to moisten all sugar, avoiding crystals on pan sides or spoon to prevent grainy fudge.
- Incorporate Evaporated Milk: Pour in evaporated milk and stir thoroughly to dissolve any remaining dry sugar crystals before boiling.
- Bring to Rolling Boil: Increase heat to medium-high until mixture reaches a full rolling boil with bubbles rising from center. Stir constantly with wooden spoon. Lower heat to medium and continue boiling for 5 minutes, stirring constantly, or until thermometer reads 234-236°F. Remove early if temperature hits this range sooner to avoid dry fudge.
- Add Chocolate Chips: Remove from heat and immediately add all chocolate chips. Stir vigorously until completely melted and smooth, eliminating any lumps.
- Add Marshmallow Cream: Microwave marshmallow cream for 10-15 seconds to soften; add to chocolate mixture and beat with wooden spoon until nearly blended.
- Add Vanilla: Stir in vanilla extract until mixture is fully combined and smooth, no marshmallow streaks visible. Stop stirring as soon as combined.
- Pour into Pan: Immediately pour smooth fudge into the prepared pan. Avoid scraping dried edges. Gently shake pan to level fudge. Do not smooth the surface; a natural rippled look is ideal.
- Cool to Room Temperature: Let fudge cool fully at room temperature until firm.
- Slice and Serve: Cut the fudge into about 7×7 rows for 49 bite-sized pieces. The fudge is rich and perfect for sharing or enjoying in moderation.
- Storage: Store fudge covered with plastic wrap at room temperature; do not refrigerate. This preserves its perfect texture and flavor.
Notes
- Use high-quality semi-sweet chocolate chips for best flavor and smoothness.
- Do not use margarine; butter is essential for proper texture and taste.
- Avoid getting sugar crystals on pan sides or spoon edges to prevent grainy fudge.
- Use evaporated milk, not sweetened condensed milk, to achieve the correct consistency.
- Stir constantly during boiling to avoid burning or crystallization.
- Do not overcook fudge past 236°F to prevent dry, crumbly texture.
- Microwaving marshmallow cream softens it for easier mixing but do not overheat.
- Do not refrigerate fudge; room temperature storage keeps it soft and creamy.