
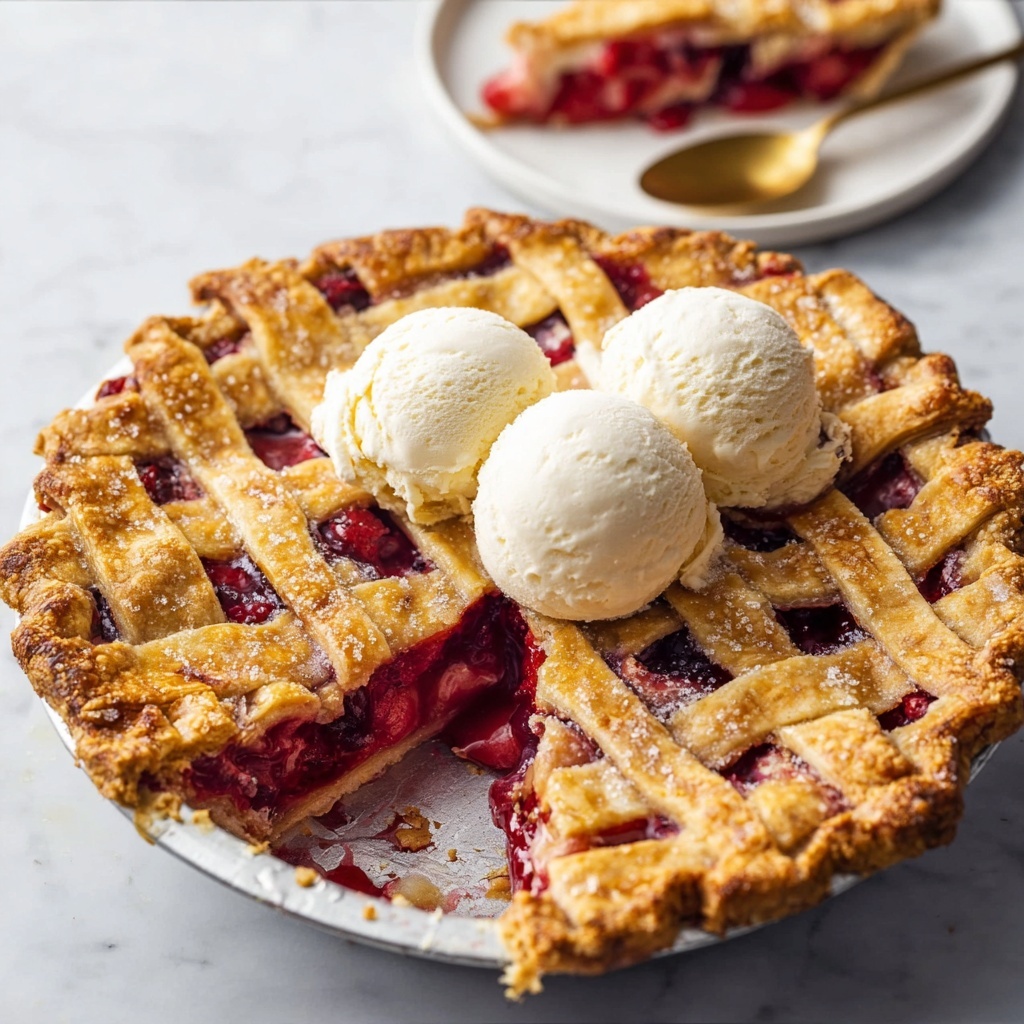
If you love the idea of capturing summer’s juiciest fruit in a flaky, buttery crust, then this Homemade Cherry Pie Recipe will quickly become your go-to dessert. It’s a perfect blend of tart red cherries and a lightly spiced, sweet filling wrapped in a golden, crisp crust. From the first bite, you’ll experience that wonderful balance of tangy and sweet that only a well-made cherry pie can deliver. Plus, this recipe is delightfully approachable, making it a fun baking adventure whether you’re a pie-making pro or trying your hand at it for the first time.

Ingredients You’ll Need
Every ingredient in this Homemade Cherry Pie Recipe plays a crucial role in creating the perfect flavor and texture. From the sweet-tart cherries to the flaky crust, each element is simple but essential. Let’s break down what you’ll need to pull this beautiful pie together:
- Refrigerated pre-made pie crust: Using two crusts allows for a solid base and a lovely top, saving time without sacrificing flakiness.
- Red Tart Cherries packed in water: These cherries provide the bright, tangy pop that’s the star of the pie.
- Granulated sugar: Sweetens the filling just enough to balance the tart cherries perfectly.
- Cornstarch: Acts as a thickener to help the cherry filling set gorgeously when baked.
- Cherry juice: Extracted from the canned cherries, it amplifies the cherry flavor beautifully.
- Kosher salt: Enhances the overall flavors and cuts through the sweetness.
- Ground cinnamon: Adds a subtle warm note that deepens the filling’s complexity.
- Unsalted butter: Enriches the filling with a smooth, velvety texture.
- Almond extract: Just a hint brings out the natural cherry essence wonderfully.
- Lemon juice and zest: The acidity brightens and lifts the flavors, balancing the sweetness.
- Cold milk or cream: Used to brush the crust for that gorgeous golden finish.
- Demerara sugar (optional): Sprinkled on top for a delightful crunch and sparkle.
How to Make Homemade Cherry Pie Recipe
Step 1: Prepare the Pie Crust
Start by preheating your oven to 425°F (220°C). Gently lay one of the pre-made pie crusts into your pie pan, pressing it in to fit snugly. Using a fork, prick the bottom crust all over to help prevent bubbling up while baking. Set it aside while you make the luscious cherry filling. This simple step ensures your crust stays beautifully crisp and doesn’t get soggy.
Step 2: Drain Cherries and Reserve Juice
Open your cans of red tart cherries and drain them, but make sure to save one cup of the cherry juice. This juice will be the base of your filling liquid, giving your pie an intense cherry flavor that really shines through. Don’t toss it, as it’s gold for the filling.
Step 3: Make the Filling Base
In a medium saucepan over medium heat, whisk together the sugar and cornstarch first. Slowly pour in the reserved cherry juice while whisking continuously to avoid lumps. This technique creates a smooth, thickening mixture that will perfectly coat your cherries and set nicely as it cooks.
Step 4: Thicken the Filling
Add the kosher salt and ground cinnamon to the saucepan, then stir constantly as the mixture reaches a low boil. Keep simmering it gently for 7 to 9 minutes until it thickens into a beautiful glossy filling. This patient simmering is what gives the pie its luscious, rich texture that holds together when sliced.
Step 5: Add Flavorful Finishing Touches
Remove the saucepan from the heat and stir in the butter, almond extract, lemon zest, and freshly squeezed lemon juice. These finishing ingredients add depth and brightness, turning a simple cherry filling into a memorable, mouthwatering delight. Transfer the mixture to a bowl and allow it to cool slightly so it won’t make the crust soggy.
Step 6: Assemble Your Pie
Pour the slightly cooled filling into your prepared pie crust. Then cover it with the second pie crust, either as a full top with vents or, for a classic look, create a lattice crust. If you’re unsure about making a lattice pattern, there are step-by-step tutorials out there—like the one in my blueberry pie recipe—that can guide you beautifully.
Step 7: Finish the Crust
Brush the milk or cream over the pie crust’s surface to encourage a golden finish during baking. For extra sparkle and crunch, sprinkle generously with demerara or coarse sugar. This finishing touch gives your pie that special bakery-style wow factor right from your oven.
Step 8: Bake the Pie
Bake your pie at 425°F for 20 minutes to jumpstart the crust browning and filling bubbling. Then reduce the oven temperature to 375°F and bake for an additional 35 to 45 minutes. Keep an eye on the crust edges and cover them with foil or a pie shield if they brown too quickly. When the crust is a deep caramel color and you see cherry juices bubbling through the lattice, your pie is perfectly baked and ready to cool.
Step 9: Cool and Serve
Allow your Homemade Cherry Pie Recipe to cool completely before slicing so the filling sets fully. Serve warm or at room temperature, ideally topped with a scoop of vanilla ice cream or a dollop of whipped cream for that classic homemade experience that’s simply irresistible.
How to Serve Homemade Cherry Pie Recipe
Garnishes
A scoop of creamy vanilla ice cream is the perfect companion to this pie, melting ever so gently into the tart cherry filling. For a lighter touch, a sprinkle of powdered sugar or a few fresh mint leaves on top adds a lovely visual and flavor contrast that will impress your guests.
Side Dishes
Cherry pie pairs fabulously with a hot cup of coffee or a robust black tea, which complements the pie’s sweetness and tartness. If serving as part of a larger dessert spread, try alongside some fresh berries or a cheese platter to create delightful flavor contrasts.
Creative Ways to Present
Slice your cherry pie into generous wedges and place each piece on a pretty dessert plate with a drizzle of caramel sauce or a dusting of cinnamon sugar. For a festive twist, add a few candied cherries or almond slivers atop your serving. Everyone loves a pie that looks as good as it tastes!
Make Ahead and Storage
Storing Leftovers
After enjoying your pie, wrap any leftovers tightly with plastic wrap or store them in an airtight container in the refrigerator. Properly stored, your Homemade Cherry Pie Recipe will stay fresh and delicious for up to 3 days. The flavors even meld and improve slightly overnight.
Freezing
If you want to prep in advance, you can freeze the pie before baking. Wrap it securely in plastic and foil to prevent freezer burn and bake it directly from frozen, adding a few extra minutes to the baking time. Or freeze baked slices individually for quick dessert options later.
Reheating
When you’re ready to enjoy your leftovers, reheat slices in the oven at 350°F for about 10-15 minutes. This keeps the crust crisp and the filling warm without making the pie soggy, so you get that fresh-baked experience every bite.
FAQs
Can I use fresh cherries instead of canned for this Homemade Cherry Pie Recipe?
Yes, you absolutely can! Fresh cherries are wonderful when in season and will give your pie a vibrant, natural sweetness. Just remember to pit them and consider adding a bit more cornstarch or adjusting the sugar based on their tartness.
What is the purpose of almond extract in the cherry pie?
Almond extract enhances and intensifies the cherry flavor, providing a subtle nutty aroma that complements the fruit brilliantly. It’s that tiny addition making a noticeable difference in depth and complexity.
Why do I need to prick the bottom pie crust before filling?
Pricking the pie crust with a fork, a technique called docking, allows steam to escape during baking. This prevents air pockets from forming and keeps the crust flat and crisp instead of puffing up or blistering.
Can I make my own pie crust for this recipe?
Definitely! While this recipe uses refrigerated pre-made crusts for convenience, homemade pie crust adds extra flakiness and flavor. Just be sure to chill it well before rolling out and watch the crust edges during baking to avoid burning.
What should I do if the crust edges start to brown too fast?
If you notice the crust edges are turning too dark while the filling is still baking, cover them with strips of aluminum foil or use a pie crust shield. This protects the edges from over-browning and helps your pie bake evenly.
Final Thoughts
There is something truly heartwarming about baking your own homemade cherry pie, and this Homemade Cherry Pie Recipe hits all the right notes without any fuss. It’s a delightful blend of tart cherries with just the right sweetness, wrapped in a golden crust you’ll be proud to share. Whether it’s a special occasion or a simple weekend treat, I can’t wait for you to try it and enjoy all those joyful bites as much as I do!
Print
Homemade Cherry Pie Recipe
- Prep Time: 15 minutes
- Cook Time: 45 minutes
- Total Time: 1 hour
- Yield: 8 servings (8 slices)
- Category: Dessert
- Method: Baking
- Cuisine: American
Description
This homemade cherry pie recipe features a flaky, buttery crust filled with a luscious and thickened tart cherry filling. Perfectly balanced with a hint of almond extract and citrus, this classic dessert bakes to a golden caramel-brown lattice crust encasing juicy, bubbling cherries. Ideal for family gatherings or special occasions, it’s delightful served warm with vanilla ice cream.
Ingredients
Pie Crust
- 15 ounces refrigerated pre-made pie crust (425 grams, 1 package; 2 crusts)
Filling
- 43.5 ounces Red Tart Cherries packed in water (1,233 grams, 3 cans)
- 1 cup granulated sugar (200 grams)
- 3 tablespoons cornstarch (21 grams)
- 1 cup cherry juice (227 grams, reserved from canned cherries)
- ½ teaspoon kosher salt
- ⅛ teaspoon ground cinnamon
- 1 tablespoon unsalted butter (14 grams, ⅛ stick)
- ¼ teaspoon almond extract (1 gram)
- ½ lemon (juiced and zested)
Topping
- 1 tablespoon cold milk or cream (14 grams)
- Demerara sugar (coarse raw sugar or coarse white sugar, optional, for sprinkling on top)
Instructions
- Preheat and Prepare Crust: Preheat your oven to 425°F (220°C). Arrange one of the pre-made pie crusts into your pie pan, gently pressing it in. Use a small fork to prick holes all over the bottom of the dough to prevent bubbling. Set it aside while you prepare the filling.
- Drain Cherries: Drain the canned tart cherries, reserving one cup of the cherry juice for the filling.
- Make Thickener Mixture: In a medium saucepan over medium heat, whisk together the granulated sugar and cornstarch. Slowly pour in the reserved cherry juice while continuing to whisk until the mixture is smooth and without lumps.
- Cook Filling Base: Add the kosher salt and ground cinnamon to the saucepan. Stir constantly as the mixture heats up and comes to a low boil. Simmer for 7 to 9 minutes, stirring frequently until the mixture thickens to a luscious, pudding-like consistency.
- Finish Filling: Remove the saucepan from heat. Stir in the unsalted butter, almond extract, lemon zest, and lemon juice until fully combined. Transfer the filling to a medium bowl and allow it to cool slightly so it will be easier to handle and pour.
- Fill Pie Crust: Pour the slightly cooled cherry filling evenly into the prepared bottom crust.
- Top Crust: Place the second pie crust over the filling. You can use a full top crust with vents or create a lattice crust for an attractive presentation. (Refer to the blueberry pie recipe for detailed instructions on making a lattice crust.)
- Brush and Sugar: Using a pastry brush, gently brush cold milk or cream over the top crust. Sprinkle liberally with Demerara sugar or coarse sugar for a sparkly, crunchy finish.
- Bake Pie: Bake the pie in the preheated oven at 425°F (220°C) for 20 minutes. Then reduce the temperature to 375°F (190°C) and bake for an additional 35 to 45 minutes. Protect the edges with aluminum foil or a pie crust shield if they brown too quickly. The crust should become golden caramel brown and the filling will bubble through the vents or lattice.
- Serve: Let the pie cool slightly before slicing. Serve warm, ideally with a scoop of vanilla ice cream for a classic pairing.
Notes
- For the best flavor, use tart cherries packed in water or natural juice without added sugar.
- Chilling the pie before baking is optional but can help prevent soggy crust.
- If the edges brown too quickly, cover them with foil or a pie shield after 20-25 minutes.
- The pie filling thickens more as it cools; avoid slicing immediately out of the oven to prevent runny slices.
- Almond extract enhances the cherry flavor but can be omitted or replaced with vanilla extract if preferred.
- Use Demerara or coarse sugar on top for added texture and sparkle; regular granulated sugar will work but won’t provide the same crunch.
