
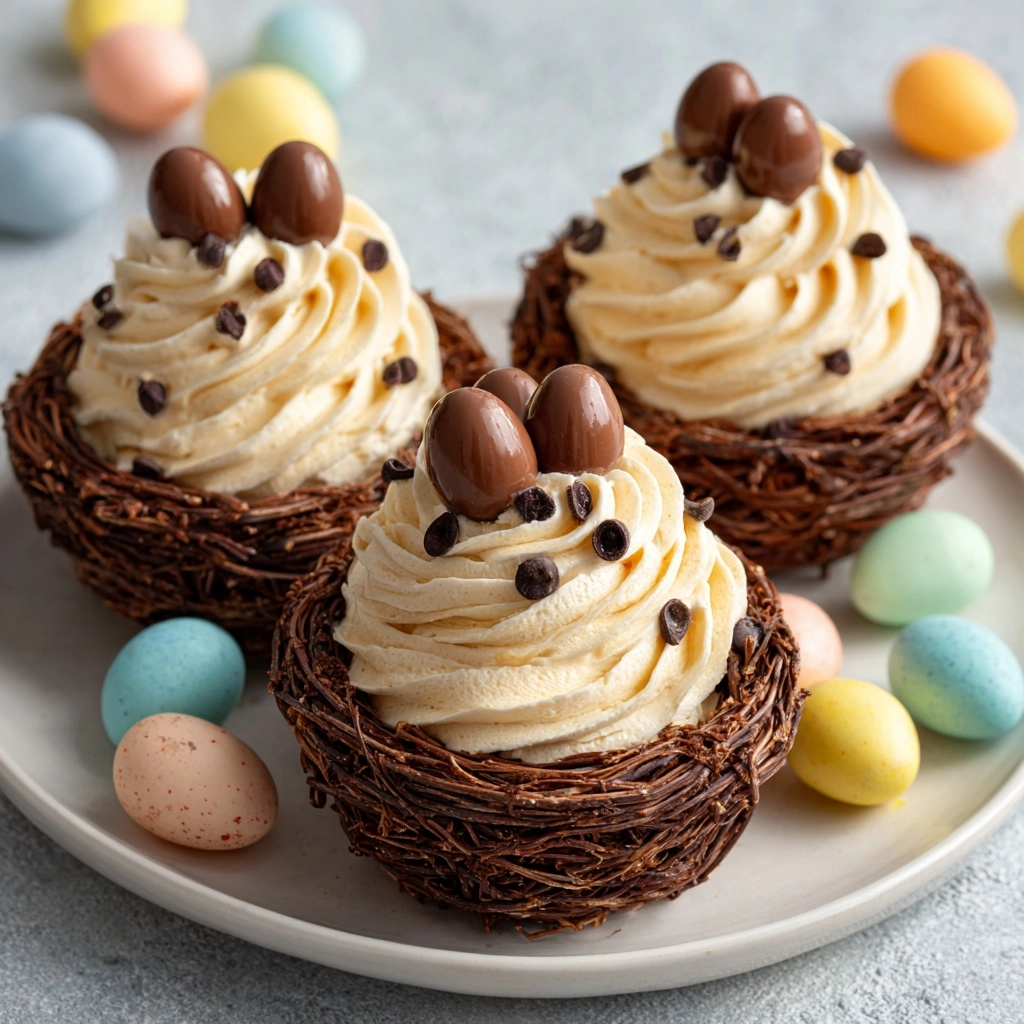
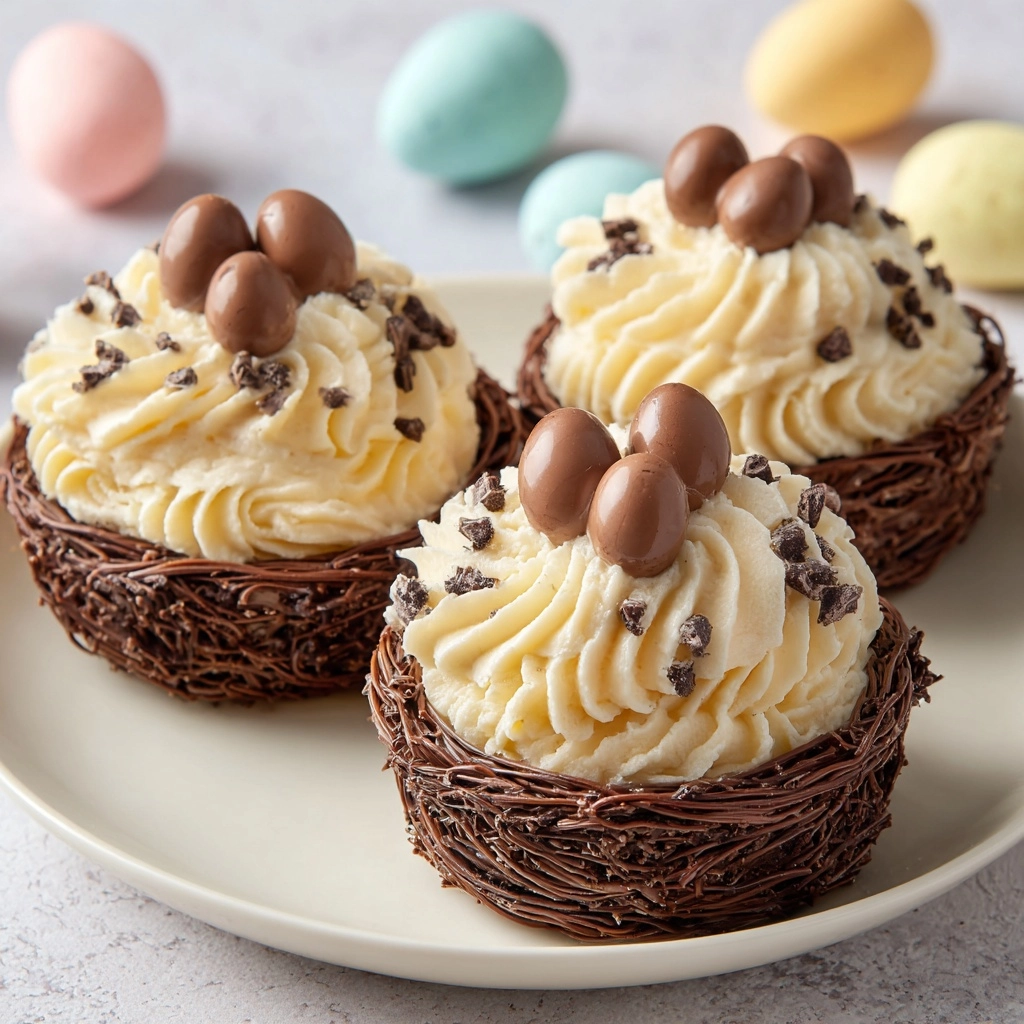
If you are looking for a show-stopping dessert that doubles as a delightful centerpiece, this Chocolate Meringue Easter Nests Recipe is your new best friend. Crisp yet airy chocolate meringue shells shaped into perfect nests, filled with rich whipped cream or silky ganache, and crowned with colorful mini chocolate eggs make for a treat that’s as fun to make as it is to enjoy. This recipe captures the essence of spring and Easter celebrations in every bite, offering a heavenly combination of textures and flavors that will have everyone asking for more.
Ingredients You’ll Need
Each ingredient in this recipe plays a crucial role in creating those delicate yet flavorful Easter nests. From the fluffy egg whites that form the meringue to the cocoa powder that gives the nests their signature chocolatey twist, every component is simple but essential in bringing this dessert to life.
- 4 large egg whites: The foundation of your meringue, providing that light and airy texture.
- 1 cup granulated sugar: Sweetens and stabilizes the meringue for glossy, stiff peaks.
- 1/4 teaspoon cream of tartar: Helps to stabilize the egg whites and keep them fluffy.
- 1/4 teaspoon salt: Enhances all the flavors subtly without overpowering.
- 1/2 teaspoon vanilla extract: Adds warmth and depth to the chocolate base.
- 2 tablespoons unsweetened cocoa powder (sifted): Gives the nests that irresistible chocolate color and flavor.
- 1/2 cup semi-sweet chocolate chips (melted): Used to coat the inside of the nests, adding a luscious chocolate layer.
- 1 cup whipped cream or chocolate ganache: The creamy filling that contrasts perfectly with the crisp meringue.
- 1/2 cup mini chocolate eggs or candy-coated eggs: For that charming, festive Easter topping.
How to Make Chocolate Meringue Easter Nests Recipe
Step 1: Prep Your Oven and Equipment
Begin by preheating your oven to 225°F (110°C) and lining a baking sheet with parchment paper. These low temperatures ensure your meringues bake slowly to prevent browning, preserving their delicate color and texture.
Step 2: Beat the Egg Whites to Soft Peaks
In a clean, dry mixing bowl, beat the 4 large egg whites on medium speed until they become foamy. This is the first stage of your meringue where the air starts incorporating, setting the stage for volume and lightness.
Step 3: Add Stabilizers and Continue Beating
Add the cream of tartar and salt to help stabilize the egg whites. Beat until soft peaks form—meaning when you lift the whisk, the peaks gently hold their shape but droop slightly. This gives you a sturdy yet pliable base.
Step 4: Gradually Add Sugar for Glossy, Stiff Peaks
Slowly add the sugar, one tablespoon at a time, while beating on high speed. This gradual addition is critical for fully dissolving the sugar and creating those shiny, stiff peaks that hold their shape flawlessly—a hallmark of any great meringue.
Step 5: Fold in Flavor and Color
Gently fold in the vanilla extract and sifted cocoa powder using a spatula, mixing just until combined. Be careful not to deflate your precious meringue; this step infuses rich chocolate flavor and deep color.
Step 6: Pipe the Nests
Transfer the chocolate meringue to a piping bag fitted with a large star tip. Pipe 3-inch circles onto your lined baking sheet, then carefully build up the edges to form a nest shape that will cradle the filling beautifully.
Step 7: Bake and Cool to Perfection
Bake the nests for 1 hour, then turn off the oven and leave the meringues inside for another hour to cool slowly. This prevents cracking and keeps the tender inside perfectly chewy while the outside crisps up.
Step 8: Add Melted Chocolate and Fill
Once cool, drizzle the melted semi-sweet chocolate inside the bottom of each nest and let it set. Then, fill with your choice of whipped cream or luscious chocolate ganache, and finish by topping with those festive mini chocolate eggs. The contrast of textures and flavors at this stage makes these nests simply irresistible.
How to Serve Chocolate Meringue Easter Nests Recipe
Garnishes
To make your Chocolate Meringue Easter Nests Recipe sparkle even more, add a dusting of cocoa powder or a few fresh berries for a pop of color and a fresh bite. Edible flowers can also bring a lovely springtime vibe that will wow your guests.
Side Dishes
These nests pair wonderfully with light, fruity sides like a fresh berry salad or a zesty lemon sorbet. The brightness of fruit provides balance to the richness of the chocolate and cream.
Creative Ways to Present
Serve your meringue nests on a rustic wooden board surrounded by pastel-colored decorations or in individual clear dessert cups for an elegant touch. You might also try layering with fresh strawberries for a trifle-inspired presentation that’s both stunning and delicious.
Make Ahead and Storage
Storing Leftovers
If you find yourself with extra meringue nests, store them unfilled in an airtight container for up to 3 days. This keeps them crisp and ready to fill whenever you want a quick, impressive dessert.
Freezing
You can freeze the unfilled nests in a single layer wrapped tightly in plastic wrap for up to one month. When ready to use, thaw at room temperature and fill just before serving to maintain that perfect crunchy texture.
Reheating
Since meringue nests are best served crisp and cool, reheating is not recommended. Instead, enjoy them as is or add freshly whipped cream or ganache for that freshly made flair.
FAQs
Can I use regular sugar instead of granulated sugar?
Granulated sugar is essential for dissolving properly into the egg whites to form stiff peaks. Using powdered sugar can change the texture, so granulated sugar is the best choice.
What if I don’t have cream of tartar?
If you don’t have cream of tartar, you can substitute with a few drops of lemon juice or white vinegar to help stabilize the egg whites.
Can I make these nests without chocolate?
Absolutely! You can omit the cocoa powder and melted chocolate for classic white meringue nests, filled with whipped cream and fresh fruit for a light alternative.
How do I know when the meringue has stiff peaks?
Stiff peaks stand straight up without drooping when you lift the whisk from the bowl. It’s the sign that your meringue is perfectly whipped and ready for the next step.
Is this recipe gluten-free?
Yes, this Chocolate Meringue Easter Nests Recipe is naturally gluten-free, making it a fantastic dessert choice for those with gluten sensitivities.
Final Thoughts
There’s something truly magical about making and sharing this Chocolate Meringue Easter Nests Recipe. Its crisp texture, chocolatey richness, and festive charm make it a staple for any springtime celebration or Easter feast. I encourage you to try this recipe—it’s easier than it looks and promises to delight everyone lucky enough to taste it. Happy baking and even happier eating!
Print
Chocolate Meringue Easter Nests Recipe
- Prep Time: 25 minutes
- Cook Time: 1 hour
- Total Time: 1 hour 25 minutes
- Yield: 8 nests
- Category: Dessert
- Method: Baking
- Cuisine: American
- Diet: Gluten Free
Description
These Chocolate Meringue Easter Nests are a delightful and festive dessert perfect for spring celebrations. Light, airy meringue nests flavored with cocoa are baked to a crisp, filled with luscious whipped cream or chocolate ganache, and topped with colorful mini chocolate eggs for an irresistible treat.
Ingredients
Meringue
- 4 large egg whites
- 1 cup granulated sugar
- 1/4 teaspoon cream of tartar
- 1/4 teaspoon salt
- 1/2 teaspoon vanilla extract
- 2 tablespoons unsweetened cocoa powder (sifted)
Chocolate
- 1/2 cup semi-sweet chocolate chips (melted)
Filling and Topping
- 1 cup whipped cream or chocolate ganache (for filling)
- 1/2 cup mini chocolate eggs or candy-coated eggs (for topping)
Instructions
- Preheat oven and prepare baking sheet: Preheat the oven to 225°F (110°C) and line a baking sheet with parchment paper to prevent sticking and ensure easy removal of the meringues.
- Beat egg whites: In a clean, dry mixing bowl, beat the egg whites on medium speed until they become foamy, indicating air incorporation begins.
- Add stabilizers and beat to soft peaks: Add cream of tartar and salt to the foamy whites. Continue beating until soft peaks form, which means the whites hold shape but are still slightly soft.
- Incorporate sugar gradually: Add sugar one tablespoon at a time while beating on high speed until stiff, glossy peaks form and the sugar is fully dissolved, ensuring a stable meringue.
- Fold in flavorings: Gently fold in vanilla extract and sifted cocoa powder until just combined to avoid deflating the meringue.
- Pipe meringue nests: Transfer the meringue mixture to a piping bag fitted with a large star tip. Pipe 3-inch circles onto the prepared baking sheet, then build up the edges to form nest shapes capable of holding filling.
- Bake meringues: Bake the nests for 1 hour at low temperature to dry them out slowly and achieve crispness without browning.
- Cool meringues: After baking, turn off the oven and let the meringues cool inside for another hour to finish drying and firm up.
- Decorate nests: Once cool, drizzle melted semi-sweet chocolate inside the bottom of each nest and allow the chocolate to set, adding extra flavor and stability.
- Fill and top nests: Fill each nest with whipped cream or chocolate ganache, then top with mini chocolate eggs or candy-coated eggs for a colorful, festive presentation.
Notes
- Store unfilled meringue nests in an airtight container for up to 3 days to maintain their crispness.
- For a variation, try using flavored ganache or lemon curd as filling to complement the chocolate.
- To make the nests even crispier, allow the meringues to dry overnight in the turned-off oven after baking.


