
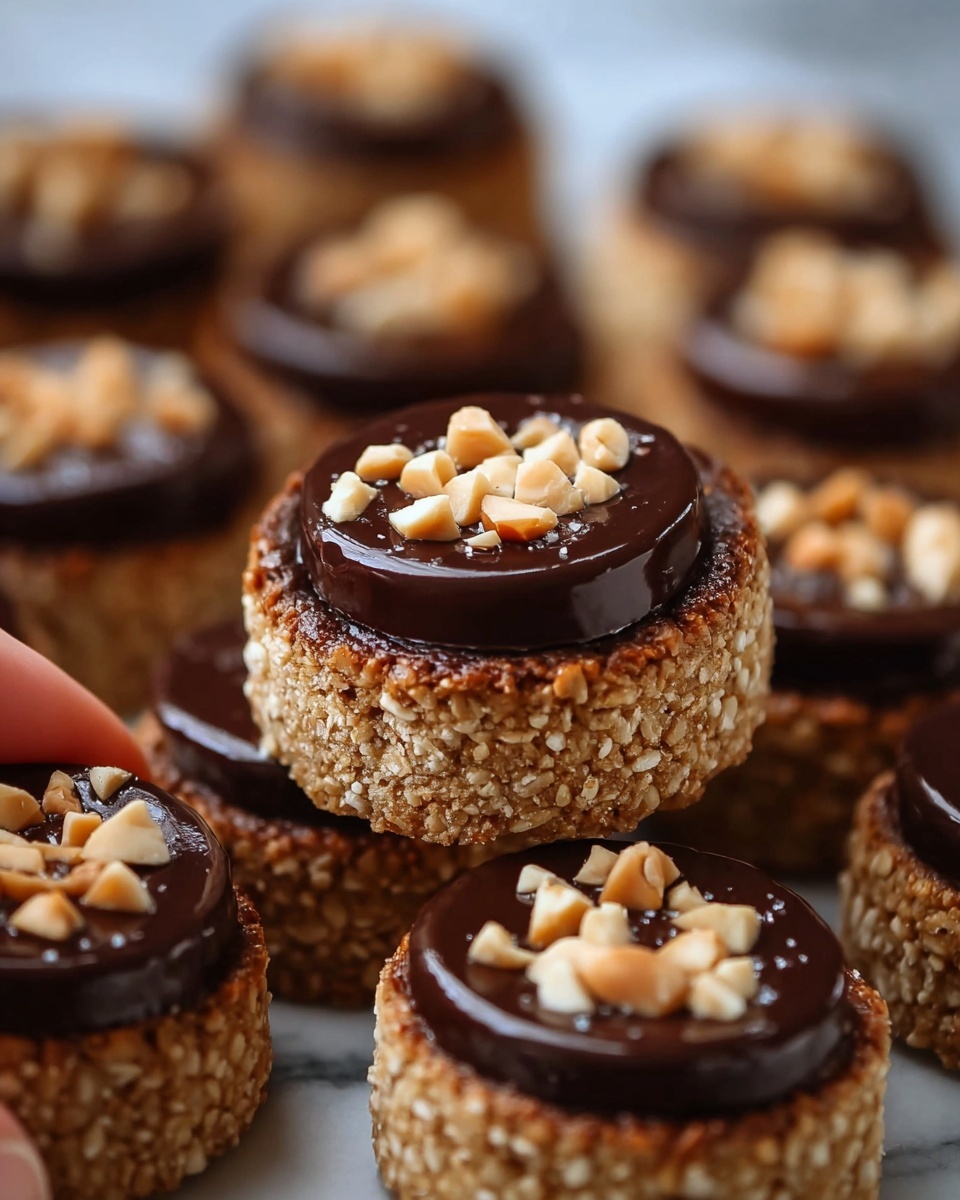
There is something irresistibly charming about these Chocolate Hazelnut Thumbprint Cookies Recipe that makes them a beloved treat for any occasion. With their buttery, tender cookie base perfectly complementing a luscious dollop of creamy hazelnut chocolate spread, each bite is a delightful harmony of texture and flavor. Whether you’re baking for family gatherings or a cozy afternoon snack, this recipe captures the cozy spirit of homemade treats in every thumbprint filled with nutty, chocolate goodness.
Ingredients You’ll Need
Ingredients You’ll Need
Gathering the right ingredients is a simple yet crucial step to ensure these cookies turn out soft, flavorful, and perfectly balanced. Each component plays a vital part, from the richness of butter to the sweet depth of brown sugar and the irresistible allure of hazelnut chocolate spread.
- All-purpose flour: The foundation of your cookie, providing structure and tenderness.
- Unsalted butter, softened: Adds rich flavor and creates that melt-in-your-mouth texture.
- Granulated sugar: Balances sweetness and helps create a delicate crunch.
- Brown sugar: Introduces moisture and a subtle caramel note that deepens the cookie’s flavor.
- Large egg yolk: Binds ingredients together and adds a lovely golden color.
- Vanilla extract: Enhances all the flavors with its warm, aromatic touch.
- Salt: Intensifies sweetness and rounds out the flavors perfectly.
- Hazelnut chocolate spread: The star of the show, filling each thumbprint with creamy, nutty chocolate bliss.
- Chopped toasted hazelnuts (optional): Adds a delightful crunch and enhances the nutty profile.
How to Make Chocolate Hazelnut Thumbprint Cookies Recipe
Step 1: Cream the Butter and Sugars
Begin by beating the softened unsalted butter with both granulated and brown sugars until the mixture becomes fluffy and light in color. This ensures a smooth, tender cookie base. Adding the egg yolk and vanilla at this stage makes the dough rich and fragrant—mix until well combined to create the perfect foundation for your cookies.
Step 2: Combine the Dry Ingredients
In a separate bowl, whisk the all-purpose flour and salt together to evenly distribute the salt. Gradually incorporate this dry mixture into the buttery mixture, stirring gently just until a soft dough forms. Be careful not to overmix, as that can make the cookies tough instead of tender.
Step 3: Chill the Dough
Wrap your dough tightly in plastic wrap and refrigerate it for at least 30 minutes. Chilling firms up the dough, which helps prevent the cookies from spreading too much during baking and maintains those precious indentations you’ll soon be filling with the heavenly hazelnut spread.
Step 4: Shape and Create Thumbprints
Once chilled, roll the dough into uniform one-inch balls. Then, using your thumb (or the back of a spoon if you prefer), gently press a small well into the center of each ball. These indentations are what give this recipe its name and will hold the luscious chocolate-hazelnut filling perfectly.
Step 5: Bake the Cookies
Place the prepared dough balls on a baking sheet lined with parchment paper. Bake them at 350°F (175°C) for 10 to 12 minutes, or until just set and starting to turn golden at the edges. This timing ensures the cookies remain soft and delicate with a slight crispness around the border.
Step 6: Add the Hazelnut Filling
Remove the cookies from the oven and, while they are still warm, spoon about a teaspoon of your hazelnut chocolate spread into each thumbprint. Return the cookies to the oven for an additional 2 minutes to slightly melt the filling, locking in the gooey, nutty richness with every bite.
Step 7: Cool and Garnish
Allow the cookies to cool completely on a wire rack, giving them time to set properly. If you’re feeling fancy or want to add a textural contrast, sprinkle some chopped toasted hazelnuts over the filling before it hardens—this little touch takes these cookies to a whole new level of deliciousness.
How to Serve Chocolate Hazelnut Thumbprint Cookies Recipe
Garnishes
While the chopped toasted hazelnuts add a wonderful crunch, consider dusting the cooled cookies lightly with powdered sugar for a touch of elegance and softness. You can also drizzle a bit of melted dark chocolate over the top to amp up the chocolate experience without overwhelming the hazelnut flavor.
Side Dishes
These cookies are naturally a delightful treat on their own but pairing them with a warm cup of coffee, a creamy hot chocolate, or a glass of cold milk creates a cozy, comforting dessert experience. For brunch or afternoon tea, serve alongside fresh berries or a fruity yogurt to balance the rich chocolate and nutty flavors.
Creative Ways to Present
For gifting or parties, arrange the chocolate hazelnut thumbprint cookies on a decorative platter lined with parchment paper and sprinkle edible gold dust or small edible flowers around the edges for a festive, eye-catching presentation. You can also sandwich two cookies with a layer of hazelnut spread or whipped cream in between to create mini cookie sandwiches that add an unexpected twist to the classic recipe.
Make Ahead and Storage
Storing Leftovers
These cookies keep wonderfully in an airtight container at room temperature for up to a week. The buttery base stays tender while the hazelnut filling retains its creamy texture. To preserve their freshness, separate layers with parchment paper to prevent sticking.
Freezing
If you want to save these treats for a later time, you can freeze the baked and cooled cookies in a single layer on a baking sheet, then transfer them to a freezer-safe container or bag. They’ll keep well for up to 3 months, allowing you to enjoy your Chocolate Hazelnut Thumbprint Cookies Recipe anytime the craving strikes.
Reheating
To revive the fresh-baked feel, warm the cookies gently in a preheated oven at 300°F (150°C) for 5 minutes. This will soften the filling slightly and restore the cookie’s just-baked charm without drying them out. Avoid microwaving, as it can make the texture rubbery.
FAQs
Can I use a different nut butter instead of hazelnut chocolate spread?
Absolutely! While the signature flavor of this Chocolate Hazelnut Thumbprint Cookies Recipe comes from the hazelnut chocolate spread, you can experiment with almond butter, peanut butter, or even plain chocolate spread. Just keep in mind that the flavor profile will change, but it can be just as delicious.
What if I don’t have hazelnuts to toast for garnish?
Don’t worry if you don’t have hazelnuts on hand. The cookies will still taste amazing without the garnish. You could also substitute with finely chopped almonds, pistachios, or simply skip the nuts and perhaps add a light sprinkle of sea salt on the filling for contrast.
How do I prevent the cookies from spreading too much during baking?
Chilling the dough before baking is key. It firms up the butter and reduces spreading, helping the cookies keep their shape and that all-important thumbprint indentation. Also, avoid flattening the dough balls beyond making the thumbprint to retain their structure.
Can I make this recipe vegan or dairy-free?
For a dairy-free version, swap the unsalted butter for a vegan butter substitute and choose a dairy-free hazelnut spread. You can also replace the egg yolk with a flax egg (1 tablespoon ground flaxseed mixed with 3 tablespoons water) to keep the dough cohesive, though texture might vary slightly.
Why should I add the hazelnut spread after the initial baking instead of mixing it into the dough?
The magic of this Chocolate Hazelnut Thumbprint Cookies Recipe lies in the contrast between the tender cookie and the soft, warm filling. Adding the hazelnut spread after the first bake keeps the texture distinct and prevents the filling from burning or becoming dry during the main baking phase.
Final Thoughts
There is something truly special about making and sharing these Chocolate Hazelnut Thumbprint Cookies Recipe from start to finish. The way the buttery cookies cradle that rich, nutty chocolate spread makes every bite a celebration. If you’re looking for a simple yet impressive bake to brighten your day or delight your loved ones, this recipe is a warm hug in cookie form—so gather your ingredients, get baking, and enjoy every delicious moment!
Print
Chocolate Hazelnut Thumbprint Cookies Recipe
- Prep Time: 15 minutes
- Cook Time: 14 minutes (12 + 2 minutes filling bake)
- Total Time: 29 minutes (excluding chilling time)
- Yield: 24 cookies
- Category: Dessert
- Method: Baking
- Cuisine: American
Description
These Chocolate Hazelnut Thumbprint Cookies are buttery, tender cookies with a crisp edge and a soft center filled with rich hazelnut chocolate spread. Perfectly baked to golden perfection and optionally garnished with toasted hazelnuts, these cookies combine sweet, nutty flavors with a delightful thumbprint design making them a crowd-pleasing treat for any occasion.
Ingredients
Cookie Dough
- 1 1/4 cups all-purpose flour
- 1/2 cup unsalted butter, softened
- 1/4 cup granulated sugar
- 1/4 cup brown sugar
- 1 large egg yolk
- 1 teaspoon vanilla extract
- 1/4 teaspoon salt
Filling & Garnish
- Hazelnut chocolate spread (e.g. Nutella), about 2 teaspoons per cookie
- Chopped toasted hazelnuts (optional, for garnish)
Instructions
- Cream Butter and Sugars: Cream the softened unsalted butter with granulated and brown sugars until light and fluffy, creating a smooth base. Add the egg yolk and vanilla extract, mixing until fully combined.
- Mix Dry Ingredients: Whisk together the all-purpose flour and salt in a separate bowl. Gradually add this dry mixture to the wet ingredients, stirring just until a soft, pliable dough forms; avoid overmixing to keep cookies tender.
- Chill the Dough: Wrap the dough in plastic wrap and refrigerate for at least 30 minutes to prevent spreading during baking and to maintain the thumbprint indentations.
- Shape the Cookies: Roll the chilled dough into 1-inch balls. Press your thumb gently into the center of each ball to create a small well for the filling.
- Bake the Cookies: Place the dough balls on a parchment-lined baking sheet and bake in a preheated oven at 350°F (175°C) for 10-12 minutes, or until just set and golden around the edges.
- Fill with Hazelnut Spread: Remove the cookies from the oven, and while they are still warm, add about a teaspoon of hazelnut chocolate spread into each thumbprint indentation. Return the cookies to the oven for an additional 2 minutes to slightly melt the filling and lock in the flavor.
- Cool and Garnish: Allow the cookies to cool completely on a wire rack. Optionally, sprinkle chopped toasted hazelnuts over the filling before it sets for added texture and flavor.
Notes
- Refrigerating the dough is essential to maintain the shape and create perfect thumbprints.
- Use room temperature butter to ensure proper creaming and texture.
- Feel free to substitute hazelnut spread with other fillings like jam or peanut butter for variety.
- To toast hazelnuts, spread them on a baking sheet and roast at 350°F (175°C) for 8-10 minutes until golden and fragrant.
- Store cookies in an airtight container at room temperature for up to 5 days.


