
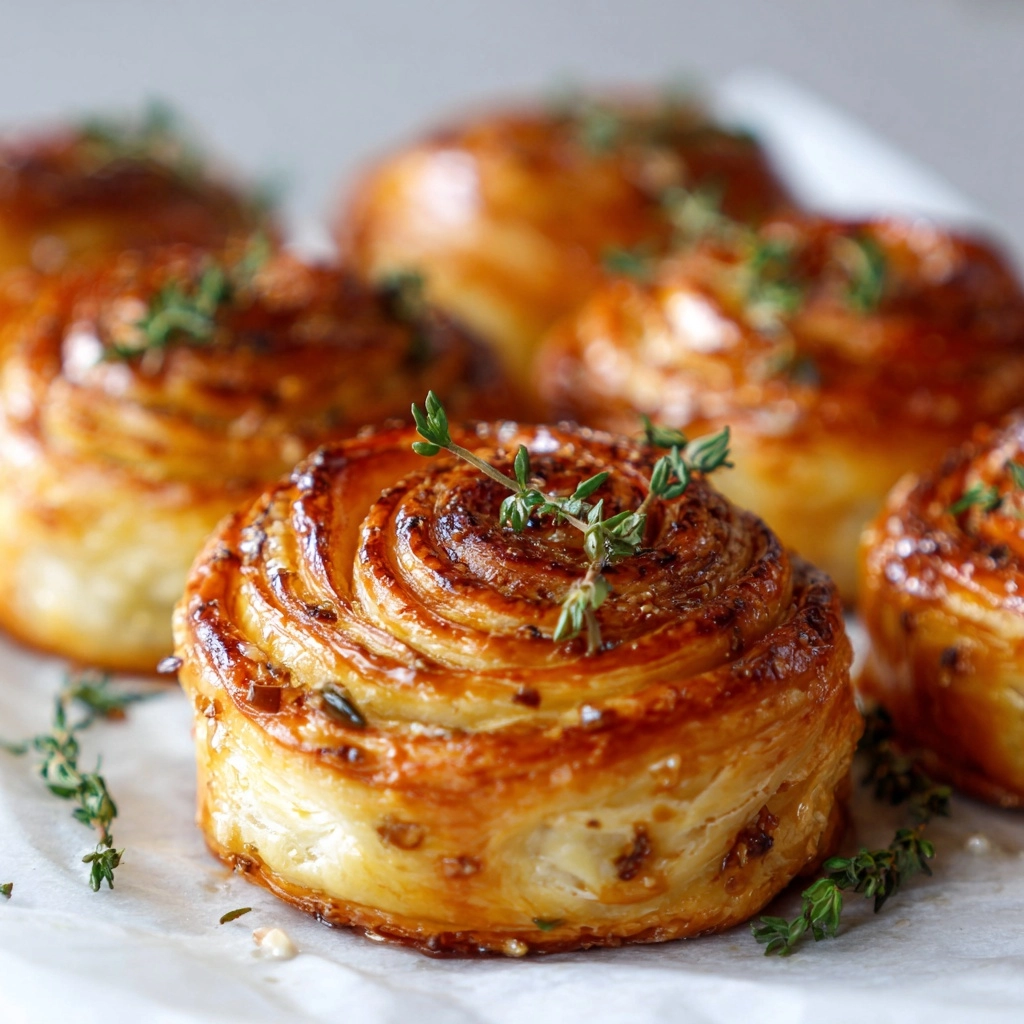
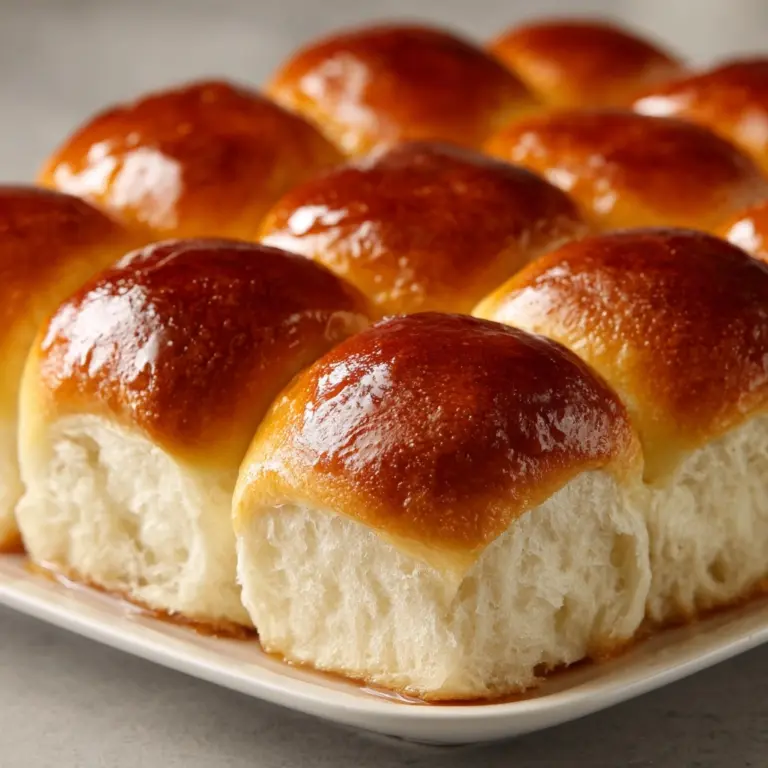
If you’re craving a snack that combines gooey cheese, fragrant garlic, and buttery puff pastry in every bite, then you absolutely must try this Cheesy Garlic Butter Rollups Recipe. These golden beauties are not only incredibly easy to make but also deliver a perfect balance of rich, savory flavors and a satisfyingly flaky texture. Whether you’re entertaining friends, looking for a quick appetizer, or just treating yourself to something special, these rollups are sure to become a fast favorite in your kitchen.
Ingredients You’ll Need
The magic of this Cheesy Garlic Butter Rollups Recipe lies in its straightforward ingredients, each playing a crucial role in taste, texture, and aroma. From the creamy mozzarella and sharp Parmesan to the aromatic garlic and flaky puff pastry, every component is essential.
- 1 sheet puff pastry, thawed: Provides a light, flaky, and buttery base that crisps beautifully when baked.
- 1 cup shredded mozzarella cheese: Melts perfectly for that gooey, stretchy cheese experience everyone loves.
- ¼ cup grated Parmesan cheese: Adds a nutty, sharp flavor that elevates the overall cheesiness.
- 2 tablespoons unsalted butter, melted: Infuses the rollups with rich moisture and helps carry the garlic flavor.
- 2 cloves garlic, minced: Fresh garlic delivers an irresistible punch of aroma and taste.
- 1 tablespoon chopped fresh parsley (optional): Brightens the rollups with a fresh, herbal note and adds a splash of color.
- ½ teaspoon garlic powder: Enhances the garlic flavor, making it deeper and more rounded.
- ½ teaspoon Italian seasoning: Brings warmth and herbaceous complexity to each bite.
- Pinch of salt: Balances and sharpens all the flavors.
- All-purpose flour for rolling: Prevents sticking and helps you get a smooth pastry surface.
How to Make Cheesy Garlic Butter Rollups Recipe
Step 1: Prepare Your Oven and Pastry
Begin by preheating your oven to 400°F (200°C) and lining a baking sheet with parchment paper to prevent sticking. Lightly flour your work surface to keep the puff pastry from sticking, then roll it out gently into a rectangle about ¼-inch thick. This smooth, even surface ensures the cheese and garlic butter layer spreads beautifully and bakes evenly for that perfect golden crust.
Step 2: Mix and Brush the Garlic Butter
In a small bowl, whisk together the melted butter, minced garlic, garlic powder, Italian seasoning, and a pinch of salt. This mixture is the flavor powerhouse of the dish, imbuing the pastry with layers of buttery garlic goodness. Brush it generously and evenly over the rolled-out puff pastry, making sure every corner gets some love.
Step 3: Add the Cheeses
Next, sprinkle shredded mozzarella and grated Parmesan cheese evenly over the buttered surface. The mozzarella melts into a luscious, stretchy layer while the Parmesan brings bursts of savory, nutty flavor that create complexity in every mouthful.
Step 4: Roll and Slice
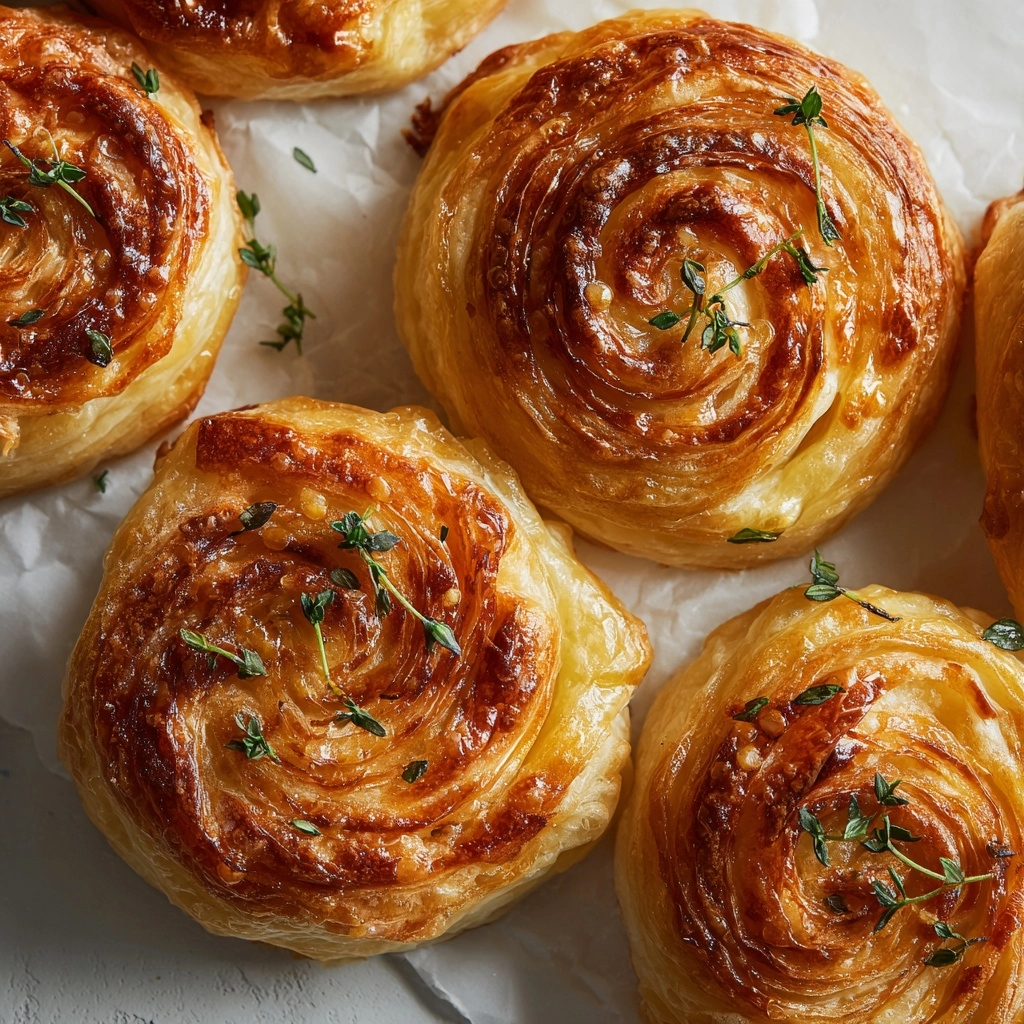
Starting from one long edge, carefully roll the pastry tightly into a log. A snug roll means your rollups hold their cheesy layers perfectly. Use a sharp knife to cut the log into 1-inch thick slices. Each slice is a mini rollup packed with cheesy, garlicky layers begging to be baked golden and puffy.
Step 5: Bake to Perfection
Arrange the rollups cut side up on your prepared baking sheet, then brush the tops with any remaining garlic butter to boost the flavor and color. Bake for 15 to 18 minutes, or until the rollups turn irresistibly golden brown and puffed up. The scent that fills your kitchen during these moments is pure happiness.
How to Serve Cheesy Garlic Butter Rollups Recipe
Garnishes
A simple sprinkle of freshly chopped parsley adds a fresh and vibrant contrast to these rich rollups. It not only livens up the presentation with a pop of green but also lends a subtle herbaceous brightness that beautifully complements the garlic and cheese.
Side Dishes
These rollups pair wonderfully with a crisp green salad or a light tomato soup. The freshness and acidity of such sides balance the buttery richness, making it a well-rounded meal or appetizer spread. They’re also fantastic alongside roasted vegetables or a charcuterie board for parties.
Creative Ways to Present
For a fun twist, serve these rollups skewered for easy finger food at gatherings. Alternatively, arrange them in a circular pattern on a platter with a bowl of marinara or creamy ranch dip in the center for an inviting, shareable presentation that sparks conversation and delight.
Make Ahead and Storage
Storing Leftovers
If you have any leftover rollups, store them in an airtight container in the refrigerator. They keep well for 2 to 3 days, which means you can enjoy that cheesy garlic goodness even the next day without hassle.
Freezing
To freeze, place the rollups on a baking tray in a single layer and freeze until solid. Then transfer them to a resealable freezer bag or airtight container. They can be stored for up to 1 month. When you’re ready to enjoy, bake directly from frozen with an additional few minutes in the oven.
Reheating
Reheat leftover rollups in a preheated oven at 350°F (175°C) for about 8-10 minutes or until warmed through and crisp on the outside. Microwave reheating is possible but may sacrifice the delightful flakiness and crisp texture.
FAQs
Can I use a different cheese instead of mozzarella?
Absolutely! Feel free to experiment by swapping mozzarella with cheeses like cheddar or Monterey Jack for a sharper or creamier flavor. Just keep in mind how the cheese melts to maintain that luscious, gooey texture.
Is it necessary to use fresh garlic?
Fresh garlic really elevates the dish with its vibrant and aromatic profile, but if you’re in a pinch, garlic powder can be used alone or in combination to impart flavor. Just adjust amounts carefully to avoid overpowering the rollups.
Can I make this recipe vegan or dairy-free?
With some substitutions, yes! Use dairy-free puff pastry and replace mozzarella and Parmesan with vegan cheese alternatives. Also, swap the butter for a plant-based option to keep the dish buttery and flavorful.
How do I prevent the rollups from becoming soggy?
Ensuring you roll the pastry tightly and bake at the right temperature helps maintain layers and crispiness. Also, brushing the tops with butter before baking promotes even browning and a flaky texture instead of sogginess.
Can I add other fillings to this recipe?
Definitely! While the classic cheesy garlic combination is fantastic alone, you can add cooked spinach, sun-dried tomatoes, or even bits of cooked bacon to personalize your rollups. Just be mindful not to overload them to keep rolling and baking smooth.
Final Thoughts
Trying the Cheesy Garlic Butter Rollups Recipe is like inviting a warm, cheesy hug into your kitchen. It’s straightforward, fun, and endlessly satisfying—whether you’re sharing with friends or indulging solo. I promise once you take that first bite, you’ll be reaching for seconds and thinking up your next get-together to make more. So grab your puff pastry sheet, gather your ingredients, and get ready to bake up some pure, savory joy!
Print
Cheesy Garlic Butter Rollups Recipe
- Prep Time: 15 minutes
- Cook Time: 18 minutes
- Total Time: 33 minutes
- Yield: 12 rollups
- Category: Appetizer
- Method: Baking
- Cuisine: American
- Diet: Vegetarian
Description
Cheesy Garlic Butter Rollups are delicious, bite-sized appetizers made with flaky puff pastry filled with a blend of mozzarella and Parmesan cheeses, garlic butter, and Italian seasonings. Perfect for parties or snacks, these golden brown, savory rollups come together quickly and bake to crispy, cheesy perfection.
Ingredients
Pastry
- 1 sheet puff pastry, thawed
- All-purpose flour for rolling
Cheese Filling
- 1 cup shredded mozzarella cheese
- ¼ cup grated Parmesan cheese
Garlic Butter Mixture
- 2 tablespoons unsalted butter, melted
- 2 cloves garlic, minced
- ½ teaspoon garlic powder
- ½ teaspoon Italian seasoning
- Pinch of salt
- 1 tablespoon chopped fresh parsley (optional)
Instructions
- Preheat and prepare: Preheat your oven to 400°F (200°C) and line a baking sheet with parchment paper to prevent sticking and ensure even cooking.
- Roll out the pastry: Lightly flour your work surface and roll the thawed puff pastry into a rectangle about ¼-inch thick, making it ready to hold the filling evenly.
- Prepare garlic butter mixture: In a small bowl, combine melted butter, minced garlic, garlic powder, Italian seasoning, and a pinch of salt to create a flavorful butter spread.
- Brush the pastry: Generously brush the garlic butter mixture all over the surface of the puff pastry for rich garlic flavor.
- Add cheese topping: Evenly sprinkle shredded mozzarella and grated Parmesan cheeses over the buttered pastry to create the cheesy filling.
- Roll and slice: Starting from one long edge, tightly roll the pastry into a log shape. Using a sharp knife, cut the log into 1-inch thick slices to form individual rollups.
- Arrange and finish: Place the rollups cut side up on the prepared baking sheet. Brush any remaining garlic butter on top of the rollups for extra flavor and golden color.
- Bake: Bake in the preheated oven for 15–18 minutes or until the rollups are puffed and golden brown, indicating they are perfectly cooked.
- Garnish and serve: Optionally garnish with chopped fresh parsley for color and added freshness, then serve the rollups warm as a tasty appetizer.
Notes
- You can substitute mozzarella with a mix of cheddar and Monterey Jack cheese for a sharper, more complex cheesy flavor.
- For a spicy kick, sprinkle crushed red pepper flakes over the garlic butter before rolling up the pastry.

