
“`html
If you are craving something warm, hearty, and irresistibly cheesy, look no further than these Cheesy Beefy Rolls: The Best Quick Snack for Comfort Cravings Recipe. Imagine tender, savory ground beef mingled with melted cheese, all wrapped inside flaky, golden puff pastry that practically melts in your mouth. This delightful snack is perfect for a cozy night in or whenever you need a quick bite that feels like a hug. It’s simple to make yet so satisfying, making it a personal favorite that I can’t wait to share with you.
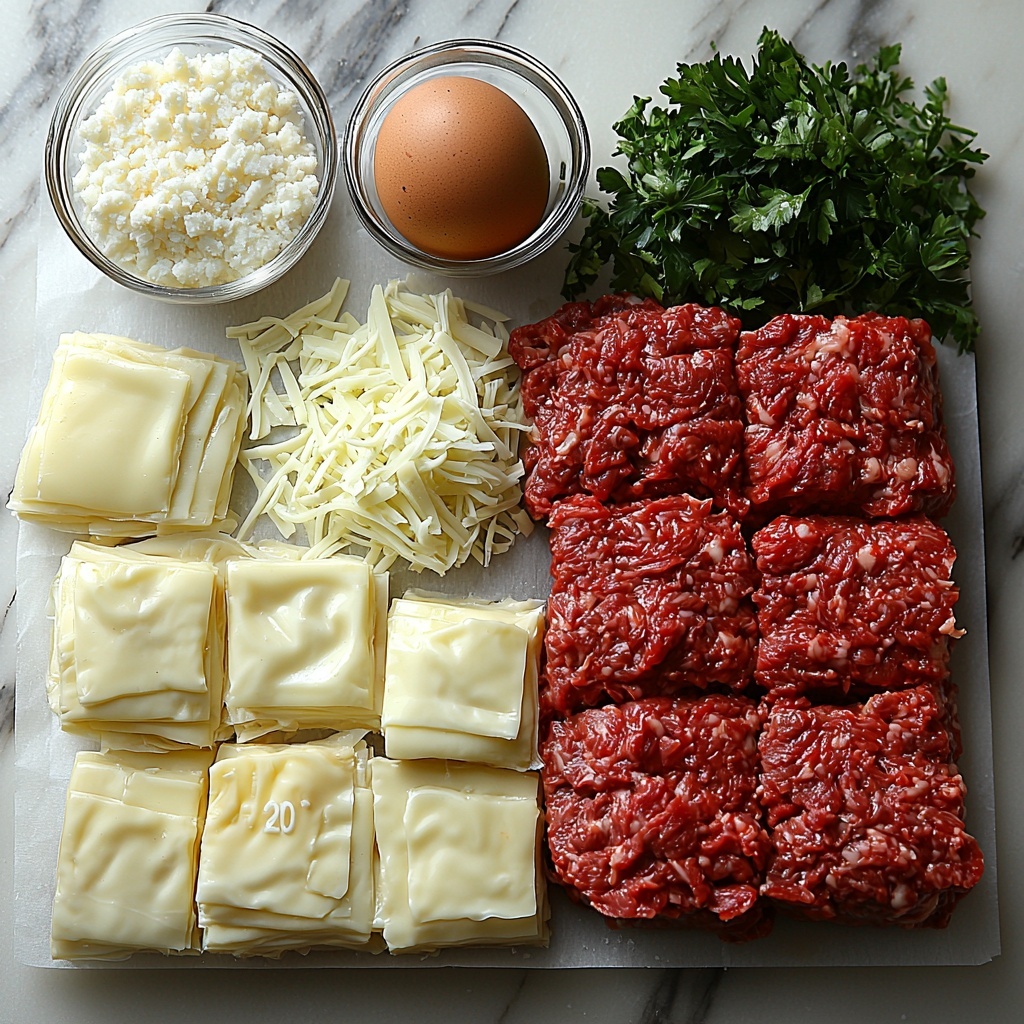
Ingredients You’ll Need
Every ingredient in this recipe plays a starring role—simple but essential for creating that perfect balance of savory, cheesy, and flaky goodness. Each component adds its own special touch, from the rich ground beef to the fresh parsley garnish.
- 1 lb Ground Beef: Use lean ground beef for less fat and a tender texture that complements the pastry.
- 1 cup Shredded Cheese (Mozzarella or Cheddar): Choose your favorite cheese to melt beautifully inside the rolls; pepper jack adds a spicy twist.
- 1 small Onion (finely chopped): Adds a subtle sweetness and tender bite to your beef mixture.
- 2 cloves Garlic (minced): Fresh garlic infuses warmth and depth to every roll.
- Salt to taste: Essential for bringing out all the flavors in the filling.
- 0.5 teaspoon Black Pepper: Adds a gentle kick; white pepper is a great alternative for a softer flavor.
- 2 sheets Puff Pastry (thawed): Make sure they are fully thawed to achieve the perfect flaky, golden crust.
- 1 large Egg: Used for brushing the tops to get that beautiful sheen and golden color; milk works for a lighter finish.
- 1 tablespoon Water: Dilutes the egg for smooth application.
- 2 tablespoons Chopped Parsley: Fresh parsley brightens up the dish visually and adds a subtle herbaceous note.
How to Make Cheesy Beefy Rolls: The Best Quick Snack for Comfort Cravings Recipe
Step 1: Prepare Your Oven and Baking Sheet
Start by preheating your oven to 400°F (200°C), ensuring it’s nice and hot for perfect puff pastry rising. Line a baking sheet with parchment paper to prevent sticking, making cleanup a breeze and keeping your rolls intact.
Step 2: Cook the Beef and Aromatics
In a large skillet over medium heat, cook the ground beef, stirring occasionally until it’s browned through and fragrant. Adding the finely chopped onion next, cook it down for about 3 to 4 minutes to develop sweetness and soften the texture, building wonderful layers of flavor.
Step 3: Season and Cool the Filling
Stir in the minced garlic, salt, and black pepper, letting everything cook together for another minute to meld those tasty scents. Then, remove your skillet from the heat and let the filling cool slightly so the cheese melts perfectly instead of just wilting.
Step 4: Fold in the Cheese
Once the beef mixture has cooled enough, gently fold in your shredded cheese of choice until it’s evenly combined. This creamy, stringy addition is what makes these rolls truly crave-worthy.
Step 5: Prepare and Fill the Puff Pastry
On a floured surface, roll out the thawed puff pastry sheets and divide each one into three equal rectangles. Spoon a generous amount of your cheesy beef mixture down the center of each piece, careful not to overfill and risk leaks.
Step 6: Seal and Brush the Rolls
Fold the edges of the pastry over the filling and pinch firmly to seal the rolls. Place them seam-side down on your prepared baking sheet. Beat the egg with water to create an egg wash, then brush this over the tops to ensure a glossy, golden finish after baking.
Step 7: Bake to Perfection
Bake the rolls for 18 to 22 minutes until they puff up and turn a gorgeous golden brown. Let them rest for about 5 minutes outside the oven—this helps the filling set just right so every bite is perfectly delicious.
How to Serve Cheesy Beefy Rolls: The Best Quick Snack for Comfort Cravings Recipe
Garnishes
A sprinkle of freshly chopped parsley on top after baking adds a pop of fresh color and a mild herbal contrast that brightens the richness of the filling beautifully. For an extra touch, a drizzle of your favorite hot sauce can add a spicy kick.
Side Dishes
These rolls work wonderfully when paired with a crisp green salad or a light tomato soup. The freshness of the salad cuts through the savory richness, while a warm soup turns this snack into a comforting mini-meal.
Creative Ways to Present
Serve the rolls on a wooden platter surrounded by small bowls of dipping sauces like garlic aioli, spicy mustard, or marinara for an inviting and interactive snack spread. You can even cut them into smaller bite-sized pieces for easy party appetizers.
Make Ahead and Storage
Storing Leftovers
If you have any leftover rolls, store them in an airtight container in the refrigerator for up to 3 days. They’ll keep their flavor well, though the pastry may soften slightly, making reheating important for best results.
Freezing
To freeze, wrap the unbaked rolls individually in plastic wrap and place them in a freezer-safe container. When you’re ready, bake them from frozen by adding a few extra minutes to the cooking time, allowing you to enjoy fresh rolls anytime.
Reheating
Reheat leftover Cheesy Beefy Rolls in a preheated oven at 350°F (175°C) for about 10 minutes, or until the pastry is crisp and the cheese inside is warm and melty. Avoid microwaving as it can make the pastry soggy.
FAQs
Can I use a different type of meat for the filling?
Absolutely! Ground turkey, chicken, or even a plant-based meat substitute can work well. Just be mindful of the cooking times and seasoning adjustments.
Is it possible to make this recipe gluten-free?
Yes, you can substitute regular puff pastry with a gluten-free puff pastry option, which is available at many grocery stores. The taste and texture might differ slightly but still delicious.
Can I prepare the filling in advance?
You sure can! Making the beef and cheese mixture ahead of time will save you some prep work on baking day. Just make sure to cool it completely before assembling the rolls.
What if I don’t have fresh parsley?
Fresh parsley is great, but you can substitute with dried parsley or fresh basil for a different herbal note, or simply leave it out if needed.
How spicy are these rolls? Can I make them spicier?
The basic recipe is mild, but you can easily add some crushed red pepper flakes or swap mozzarella for pepper jack cheese to amp up the heat without overpowering the dish.
Final Thoughts
You really can’t go wrong with Cheesy Beefy Rolls: The Best Quick Snack for Comfort Cravings Recipe—they’re that perfect blend of cozy, cheesy, and meaty all wrapped up in buttery puff pastry. Whether you’re feeding a crowd or treating yourself after a long day, these rolls hit the spot every time, so I hope you’ll give them a try and embrace the comfort in every bite!
“`
Print
Cheesy Beefy Rolls: The Best Quick Snack for Comfort Cravings Recipe
- Prep Time: 20 minutes
- Cook Time: 22 minutes
- Total Time: 42 minutes
- Yield: 6 servings
- Category: Snack
- Method: Baking
- Cuisine: American
Description
These Cheesy Beefy Rolls are a quick and comforting snack, featuring a savory blend of browned ground beef, melted cheese, and flavorful seasonings all wrapped in flaky puff pastry. Perfectly golden and easy to make, they satisfy any comfort food craving.
Ingredients
Beef Filling
- 1 lb Ground Beef (lean for less fat)
- 1 small Onion, finely chopped (or shallots for a milder taste)
- 2 cloves Garlic, minced (or garlic powder as substitute)
- Salt, to taste
- 0.5 teaspoon Black Pepper (or white pepper for subtler flavor)
- 1 cup Shredded Cheese (Mozzarella or Cheddar; pepper jack for spicy kick)
Pastry
- 2 sheets Puff Pastry, thawed (fully thawed for best results)
Egg Wash
- 1 large Egg
- 1 tablespoon Water
Garnish
- 2 tablespoons Chopped Parsley, fresh
Instructions
- Preheat Oven: Preheat your oven to 400°F (200°C) and line a baking sheet with parchment paper to prevent sticking and ensure even baking.
- Cook Beef: In a large skillet over medium heat, cook the ground beef, stirring occasionally until fully browned and no longer pink.
- Add Onion: Add the finely chopped onion to the skillet and cook for 3-4 minutes until softened and translucent.
- Add Garlic and Seasoning: Stir in the minced garlic, salt, and black pepper. Cook for an additional minute to release the flavors, then remove the skillet from heat and allow the mixture to cool slightly.
- Combine with Cheese: Once the beef mixture has cooled, fold in the shredded cheese until it is evenly distributed throughout.
- Prepare Pastry: On a floured surface, roll out the thawed puff pastry sheets and cut each one into three equal rectangles.
- Fill Pastry: Spoon a generous amount of the beef and cheese filling down the center of each pastry rectangle.
- Seal Rolls: Fold the edges of the pastry over the filling, pinching the seams tightly to seal. Place the rolls seam-side down onto the prepared baking sheet.
- Brush Egg Wash: Beat the egg with water to form an egg wash, then brush this over the tops of each roll to promote a golden, glossy finish.
- Bake: Bake the rolls in the preheated oven for 18-22 minutes until they puff up and turn a beautiful golden brown.
- Rest and Serve: Remove from the oven and let the rolls rest for 5 minutes before garnishing with chopped parsley and serving warm.
Notes
- Use lean ground beef to reduce fat content without sacrificing flavor.
- Substitute shallots for onions for a milder flavor profile.
- If fresh garlic is unavailable, garlic powder works as an effective substitute.
- Ensure puff pastry is fully thawed before rolling for best texture and handling.
- Brush egg wash evenly to achieve that classic golden crust.
- Allow rolls to cool slightly before serving to avoid burns from hot filling.
